Happy New Year, readers! It has been a while since I blogged, partially because of the busy-ness brought on by fourth quarter craft sales, but also because I encountered a vision issue in late November. Hopefully that issue will be resolved this month with a couple of laser procedures, and I’ll get back to regular blogging.
The focus of today’s post is craft fair tips, based on my own experiences, especially this past year. Mind you, I don’t do many of these—maybe two or three a year—but every time I do, I learn something new. The beginning of the year is a good time to reflect and share, so here we go!
1. Identify the appropriate selling venue for your crafts.
Although networking with other sellers can enable you to learn about good places to sell, it’s important to recognize that what works for one seller may not work for you. Everyone has unique needs and products. In addition, a site that works well one year may not work well the next year for any number of reasons. Most importantly, keep in mind that it’s less important how many craft shows you do than it is to do the ones that are appropriate for your business.
There are many factors that can affect your sales outcome, some of which you can control and others that you can’t. You can control how your space looks, the types and quantities of your products, and the way you approach your customers. You can’t control the ways that a craft show advertises (or whether there is any advertising at all), the weather on the day of the show, and often your booth location (although sometimes you can request the same space as the previous year if you are a repeat seller). You can’t control whether there will be wireless access for credit card sales, who your adjacent sellers will be, or the hours of selling. In short, you will have to balance what you can control versus what you can’t in selecting your selling venue.
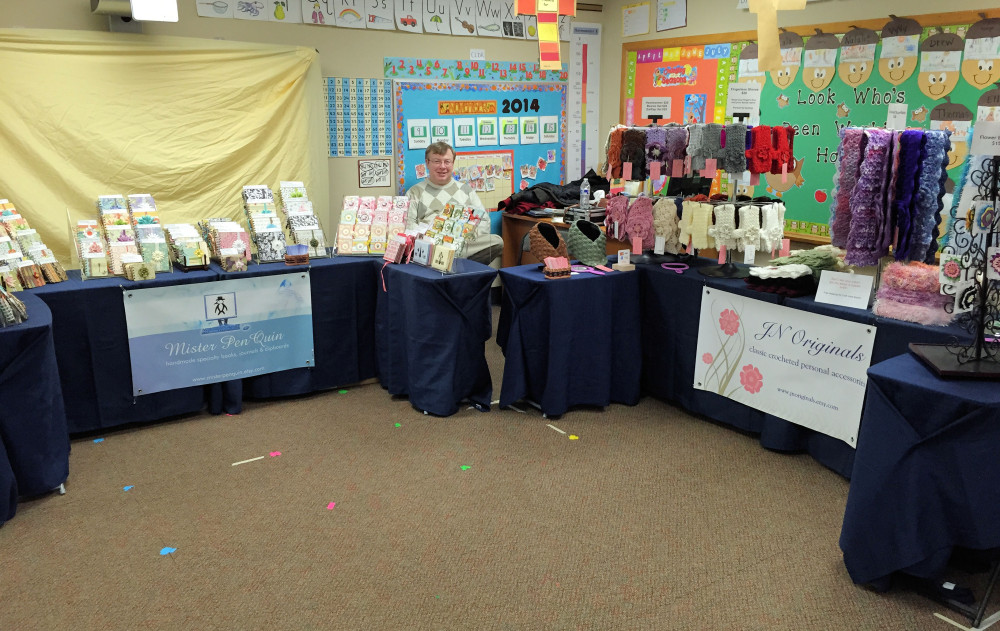
When you have done as much research about a selling venue as you can, it’s time to make a decision. The rental cost of your space, how far you have to travel and whether that involves overnight costs, whether or not the location mixes craft sellers and home show vendors, how much advertising is provided, and how long the venue has been around are all factors to consider. Sometimes you simply have to make a leap of faith, as I did in mid-October, when I followed up on the recommendation of a fellow Blogging Business Artisans member. I rented a tiny five-by-eight foot booth in southwest Iowa, two-and-a-half hours away from my home. The craft fair opened at eight o’clock on a Saturday morning, but set-up the previous evening involved a hotel stay. Risky! This turned out to be my best selling venue ever, however, teaching me that you don’t need a large space to produce good sales.
Once you have identified what you think is an appropriate place to sell, you may need to sell there for at least a couple of years to determine whether this is a site that should remain on your permanent selling schedule. Make no mistake: how well a site works for you can change from year to year, based on a variety of factors. And sometimes you simply have bad luck. One year at a craft show where I still sell, the adjacent seller was going out of business and literally gave away her products on the second day of the show. As you might imagine, there was a lot of traffic around that booth, but it didn’t flow into the rest of the room. This was an unusual situation, however, and I haven’t encountered a similar issue since then.
2. Identify the best time of year for your crafts to sell at craft fairs.
I don’t typically sell at craft fairs during the first three quarters of the year. Many retail sellers make the most profit during the fourth quarter of the year, so I use that as my cue for when to schedule craft fairs. I’m open to a trial spring or summer show, however, if the situation is appropriate. Because one of my product lines is seasonal (winter scarves, gloves and hats), it is not a good match for a warm-weather show. In contrast, I’m still learning about what might be the best time of year to sell my handcrafted books. I sold them locally at a craft fair this past year in side-by-side booths that wrapped around a corner—one for my crocheted accessories, and the other for my books. Results were inconclusive. If I had not sold both types of products at this show, I am not sure I would have done well enough to justify selling the books. I will have to try again, and see what happens.
3. Organize your products in ways that are both attractive and practical.
Earlier this year I read a blog post by Christin Sander, Craft Fair Vendor Sales Tips and Booth Ideas, that stresses how you display your merchandise and how you set up your space are more important than what you sell, or how well your products are made.
“Many vendors make the mistake of believing their product will sell itself. While it is true that good craftsmanship is important–it is NOT what brings you the bulk of your new customers. Your display—the craft booth itself, is what you really need to focus on,” writes Christin.
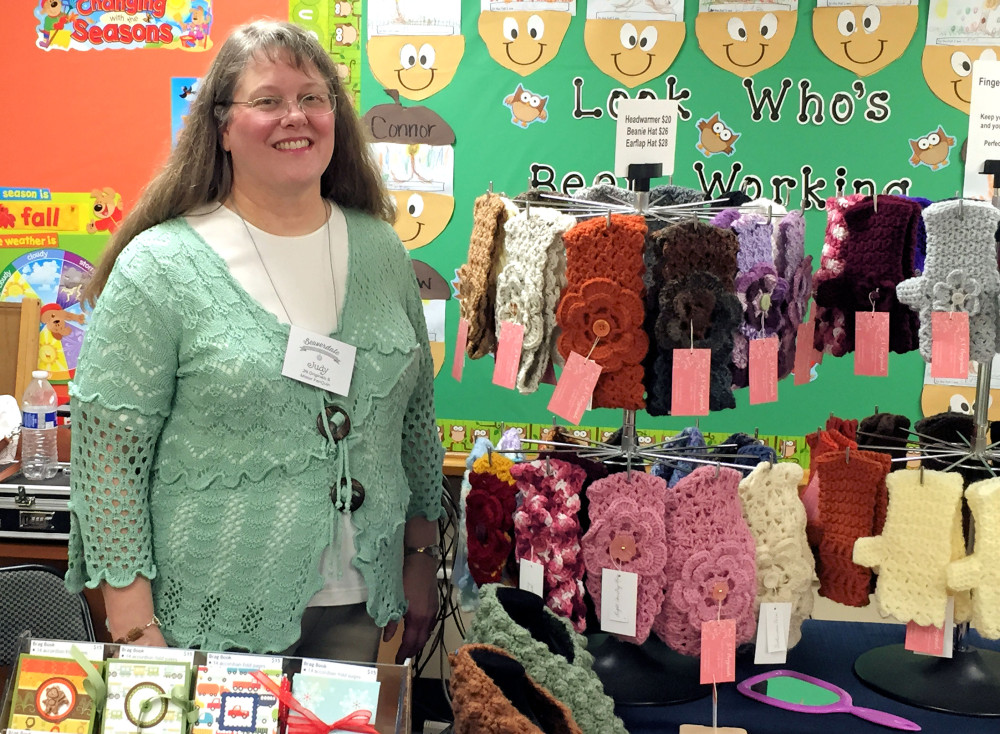
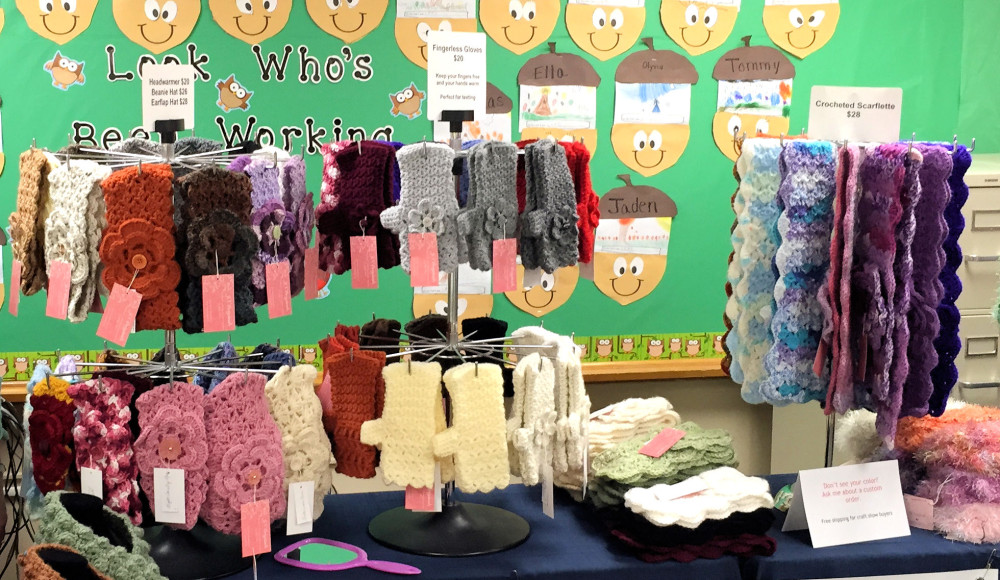
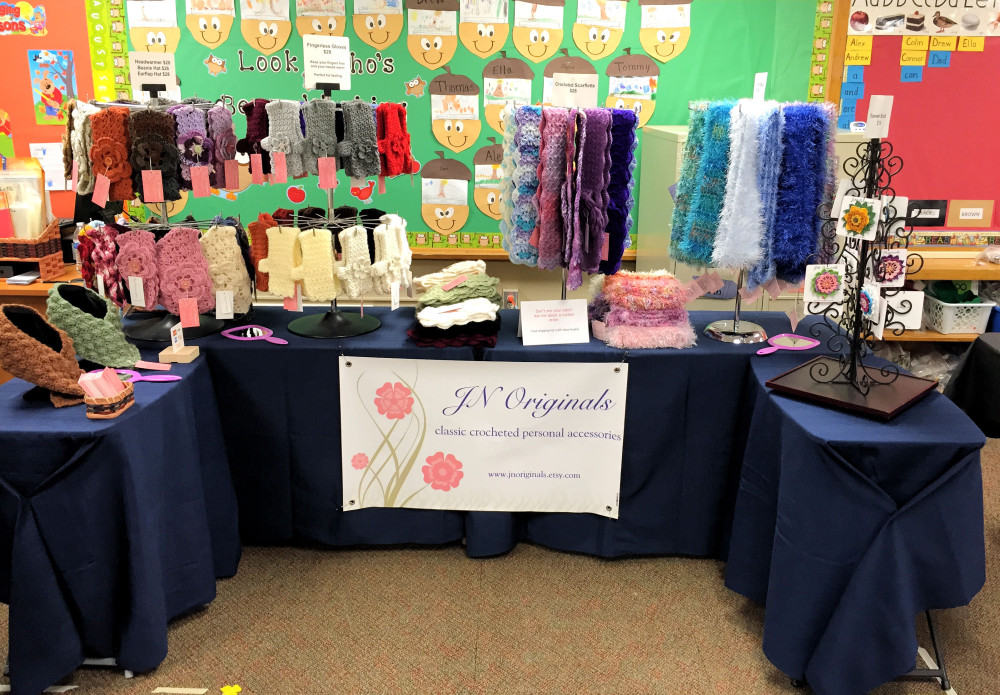
This probably shouldn’t surprise anyone, since what people buy is often based on visual appeal. Online craft sales, for example, rely heavily on good photography. At a physical venue, you need to raise your merchandise as close as possible to eye level to take advantage of the principle of visual appeal. That can mean varying the heights of your products, avoiding flat display of them on a table, or even lifting the height of the table. I use spinning display fixtures that place products right in front of a raised hand for most of my crocheted accessories, for example.
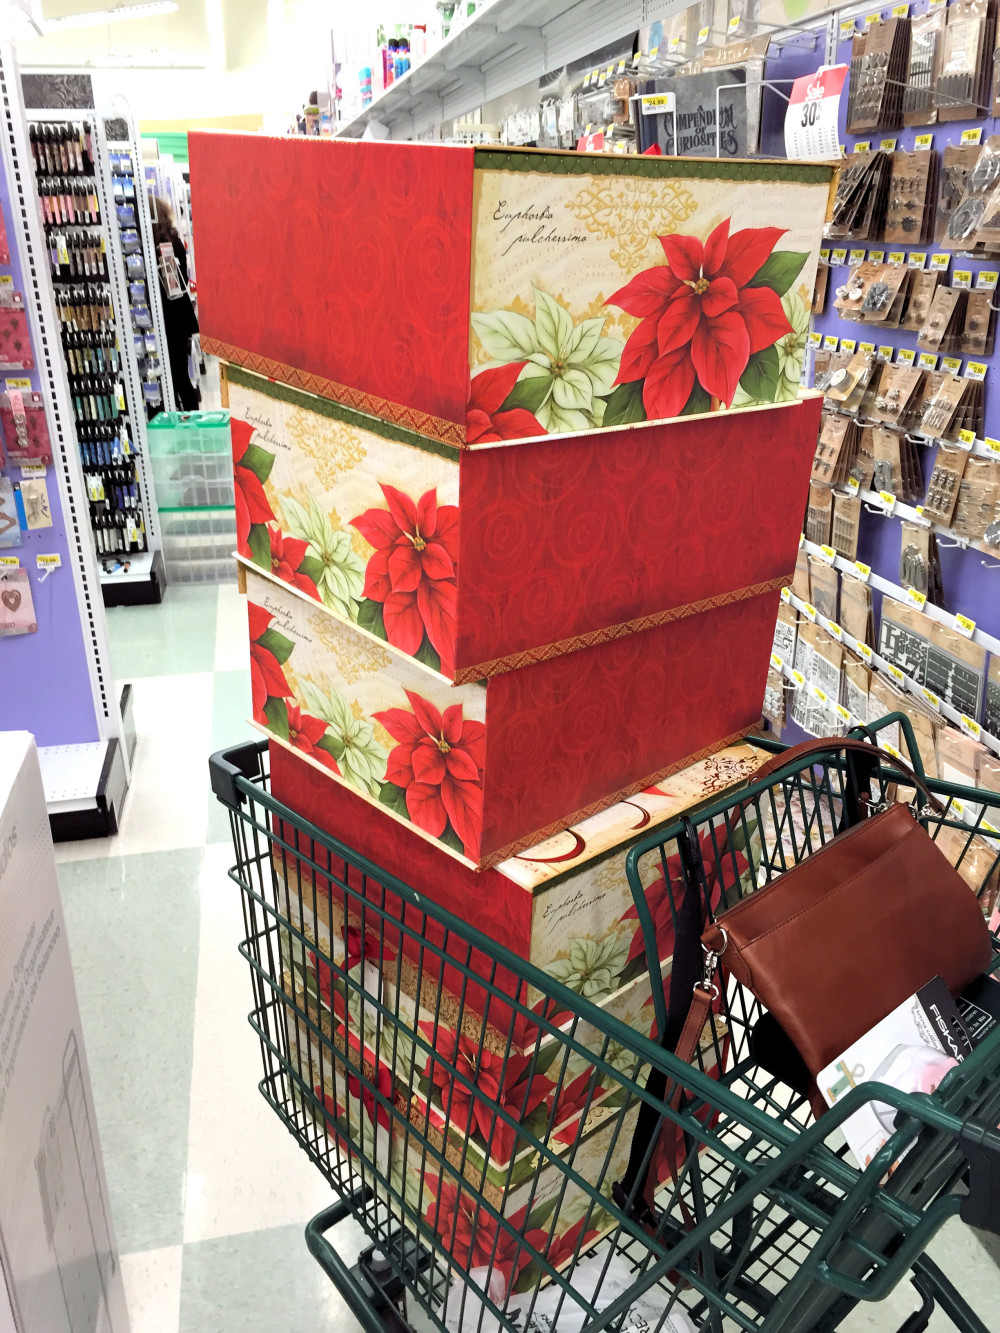
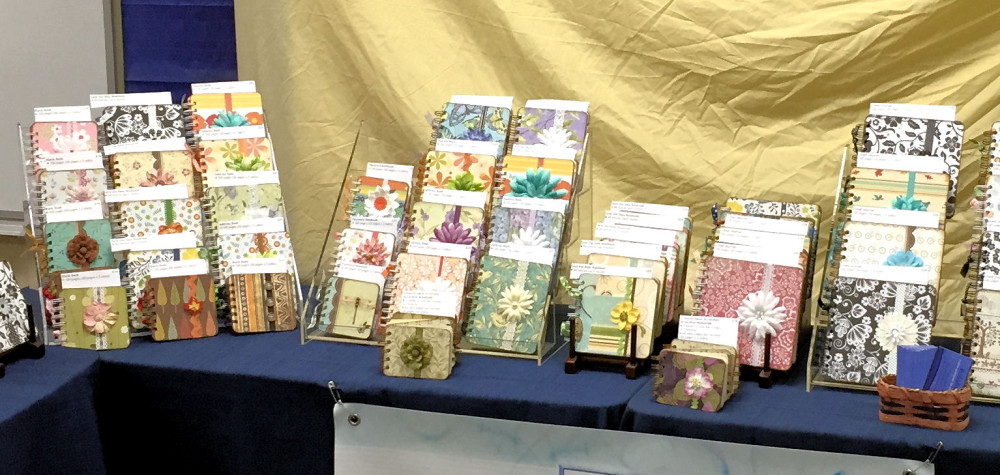
Although my handcrafted books are not displayed flat, they still need to be placed closer to eye level. One way to do so is to stand table legs on bed risers, and cover them with a long table skirt or table cloth. My tables are lightweight, though, and easily nudged, so I have visions of someone knocking over a riser, and all of the merchandise toppling onto the floor. Not a great way to make an impression! Alternatively, I may raise the height of my tiered acrylic display racks by placing boxes beneath them. When holiday gift boxes were on sale at my local fabric store recently, I bought half a dozen of them. They can also serve as storage space for the books when I transport them.
The importance of stability, when you raise the height of your products, display fixtures, or tables, was brought home to me by what happened to another seller at a show this past year. The seller displayed a bib she had sewn on a teddy bear seated on a wooden bench. In principle, this was a great way to attract attention. The bench, however, was pushed up against the back of the table as close to the edge as possible. A customer bumped the table and the wooden bench toppled onto the seller’s head, while the bear went flying into my booth. Embarrassed, the customer apologized and then left. No sale.
Think about browsing from a buyer’s point of view. When I shop for wearable accessories, for example, color is always an important consideration. To make it easier for my buyers to locate the color they want, I group similar colors together. Grouping similar items together makes selection easier for your customer.
I also provide multiple hand mirrors so that more than one customer at a time can try on an accessory and see how it looks.
4. Identify and price your products with appropriate signage.
Potential buyers would rather ask you about your crafting process than about your prices. It doesn’t matter whether your items have individual tags or you use a prominent sign, as long as the prices are easy for a customer to locate. In my case, I prefer to use signs above my spinner racks, and this seems to work well for everyone.
I made a mistake, however, when I first priced my handcrafted books. I inserted a bookmark-style price tag between the back cover and last page of each book because I didn’t want to use adhesive labels that could be difficult to remove. The height of the price tag obscured the book immediately above it, and/or fell out of the book when people flipped through the pages. The overall result was that people seemed afraid to handle the books and look at them. Not good for sales! As soon as I noticed this, I removed all of the price tags and trimmed them to create small signs I taped to the display racks. It was remarkable how quickly the browsing behavior of my customers changed. The lesson to be learned here is that you don’t want to make your customers work too hard to ferret out information about your products. Make the signage simple and easy to locate. And always bring scissors and tape!
What about signs that describe what you sell? If what you sell is obvious, such as soap or candles, you probably don’t need to have a sign that labels or describes your product—unless, of course, you want to draw attention to a special quality or use. But keep your description brief—you have only seconds to catch a customer’s attention before that person moves on to the next booth. If you have a difficult-to-identify item, on the other hand, a sign is essential. At one craft show I attended, the seller next to me had a row of bottles attached to circles sitting on her table. Neither I nor her potential buyers could figure out that they were bird feeders until they asked. And most did not. In addition, none of the items were priced, and the seller sat behind a table, looking at her cell phone for much of the show. Not surprisingly, her sales were pretty scarce.
Another type of signage to consider is a table or backdrop banner. I was surprised at how inexpensively I could purchase a heavy-duty vinyl banner at Vista Print. You can upload your own design, or use their online design tools to create one. I honestly don’t know if a banner helped sales or not, but in my opinion it clearly identified what I was selling, as well as my online selling location on Etsy. This year I was particularly surprised by the number of people who immediately recognized Etsy as a craft selling venue. The Web address on the banner seemed to prompt people to comment, “Oh! You sell on Etsy,†and then take a business card that was easily accessible on my table. Many customers asked if I took custom orders. It was gratifying that at least a couple people contacted me after the show, or visited my Etsy shop, and made purchases. Make sure you bring an adequate supply of business cards to your show!
5. Be prepared to accept different forms of payment.
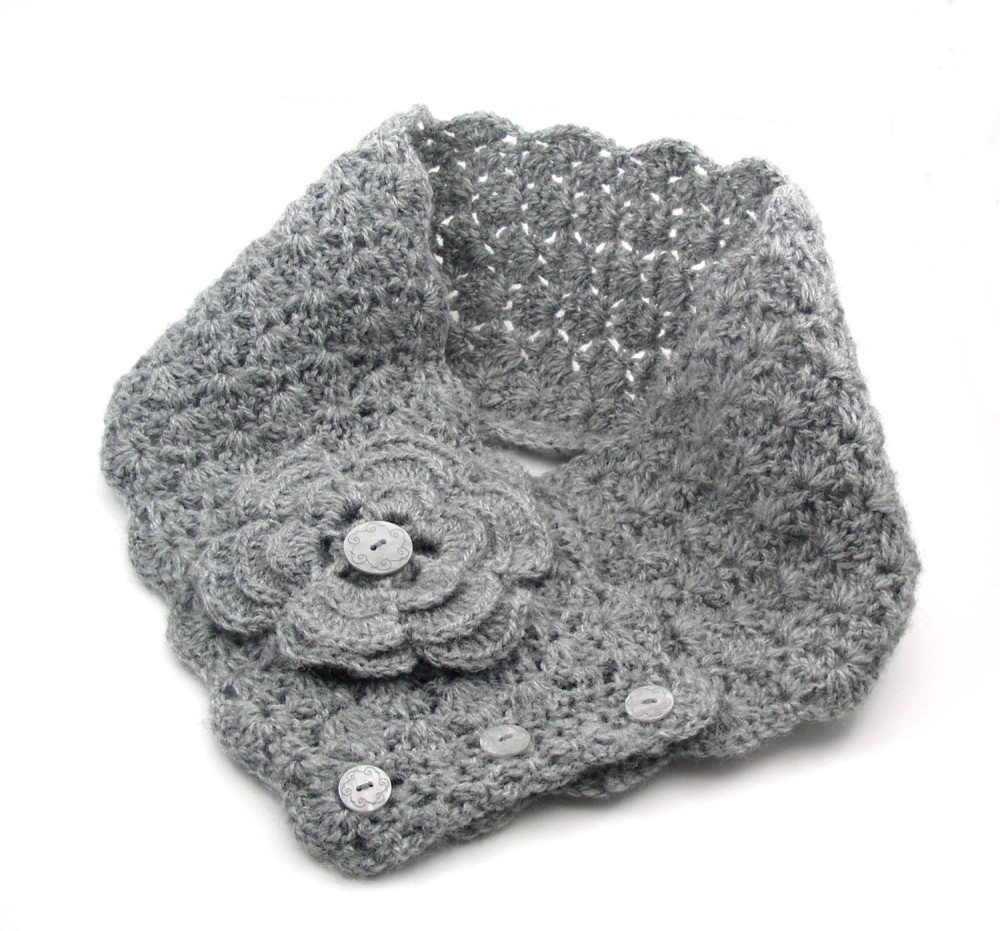
At one craft show two years ago, a seller told me that items priced above $20 did not sell well at that venue. She had noticed, of course, that my crocheted items were priced at $15 and higher. Interestingly, I did very well at that two-day show, and on the second day the seller bought one of my items for $20. I don’t recall whether she used cash, credit or a check, but in any event I was prepared to accept whatever form of payment she preferred to use.
I am always amazed at the number of sellers who accept cash only at a craft show. Some fear they will receive a bad check, and others think credit card processing fees are too high for a small business to accept. Still others fear that taking multiple forms of payment is too much work, and that it will distract them from the business of talking to their customers.
Let’s address these fears, one at a time. To be honest, I have never run across a bad check, but if I encountered one, I would simply treat it as the cost of doing business. In other words, I would treat it as a business loss, and move on. Credit card processing fees are also a cost of doing business, and they don’t have to be high if you use one of the free credit card readers that work with your smart phone. Finally, to keep track of the bookkeeping side of selling versus the marketing side, it’s helpful to have a selling partner with you at craft shows. My husband, who is very outgoing, has a knack for talking to people. Once a sale takes place, he wraps the item(s), and I process the sale—whether the payment is in cash, by check or credit card, or it involves a custom order.
Why is it important to accept credit cards? Most craft show buyers bring a limited amount of cash with them, few bring a checkbook, and most have a debit or credit card on their person. Once your customer runs out of cash, he or she will either go home, or shop only at booths that accept checks or credit cards. And if your items are priced at $15 or more, fewer of your customers will prefer to use cash to buy them; they’ll save their cash for lower-priced items.
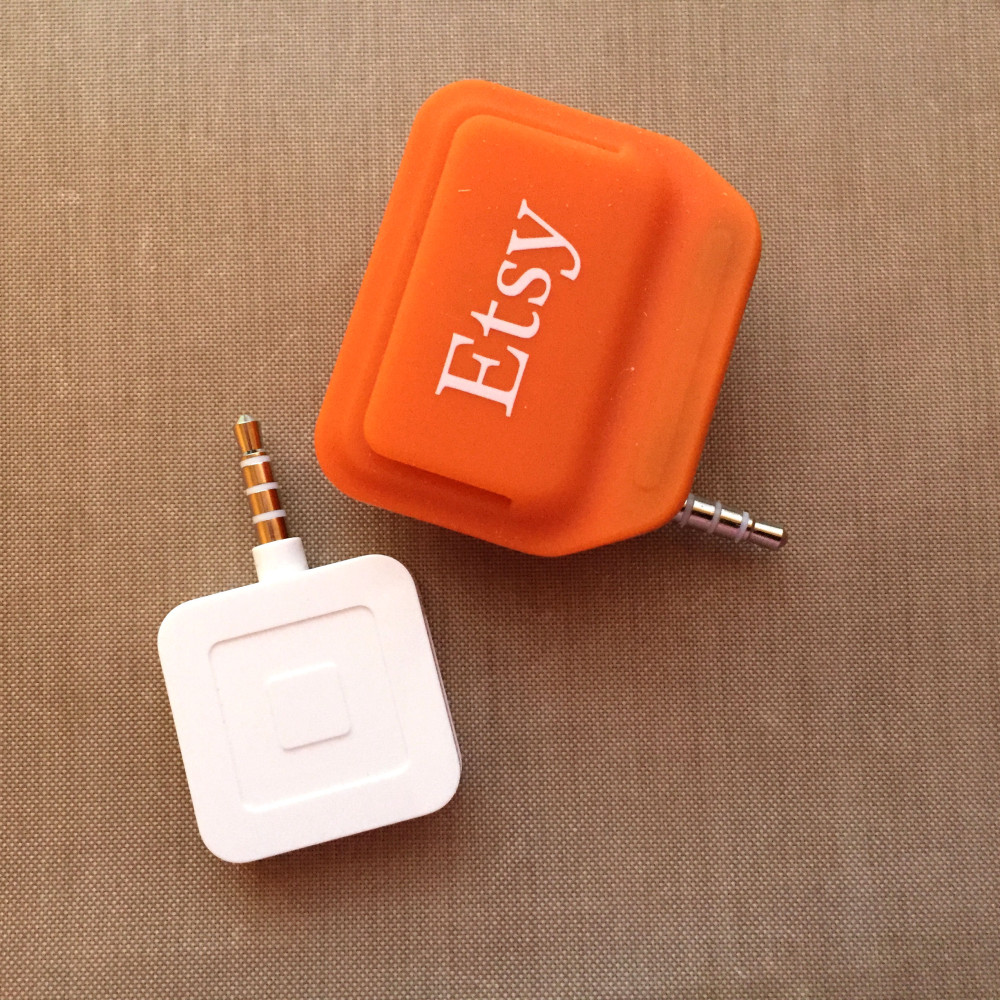
When I first began selling at craft shows, there were fewer economical options for sellers to accept credit card payments than there are today. I used ProPay, which required me to use traditional multi-part credit card forms and a slider machine many folks call a “knuckle buster.†I moved on from ProPay to Square, which takes advantage of a wireless connection and a card-sliding adapter that you insert into one end of your smart phone. Supposedly, you are able to use Square offline when a wireless connection is not available, but for the first time this year, I encountered a venue where nothing was working. Thankfully, I had brought multi-part credit card forms with me as a back-up, and those worked just fine. I entered credit card numbers manually when I got home, and took phone numbers in case I had to contact purchasers later about a problem with their credit card. If I planned ahead of time, I would have brought another credit card reader with me, as there are several on the market. Square and PayPal provide free readers with similar fee structures, and Etsy recently introduced its own card reader that updates your shop listings in real time when you sell items at a craft show from your shop. Additionally, you can use the Etsy credit card reader anytime you want to sell an item, even if it is not listed in your shop, or if you are doing a custom order. Its fee structure is similar to that of the other credit card readers. ProPay also features a credit card reader called JAK that wasn’t available when I used this service; however, ProPay charges $14.95 for the reader.
6. Plan on bringing more of the appropriate products to a craft show than you think you will need.
I learned the hard way that whatever number of items you think you will need at a craft show, you actually need more. By the third craft show of last year, I had run out of all the popular colors in my fingerless gloves, scarflettes and headwarmers. In addition, I never anticipated how popular cowls and neckwarmers are these days. The few items I brought were gone by the last show, and I didn’t have enough time between shows to keep up with the demand. This is a classic mistake, of course, that relates to planning. In a perfect world, you should craft today what you plan on selling six months from now. To remedy that issue this year, I am charting last year’s most popular items and colors, and am planning to create three times that number of items this year. The bottom line is that you can’t sell what isn’t available. And when the items you make by hand take a great deal of time, as is true with crocheted work, what is required is lots of focus and dedicated time, ahead of time.
A corollary to bringing more items to a craft show than you think you will need is paying attention to your potential customers when they stand in front of your booth, chatting with each other. Take time to really listen to what people are saying as you plan your inventory for the next show or for next year. From more than one person last year, I learned that what appeals to them about my neckwarmers is the ease with which you can put one on and take it off. That’s a selling point and a conversation starter.
What tips or suggestions for a successful craft show have I left out? Please let me know in the comments below.
© 2015 Judy Nolan. All rights reserved.
Great post, Judy!
I definitely need to find a way to take credit/debit card payments before my Fall 2015 craft fairs.
Most of my venues don’t have wifi—and very few booths have electricity. My current phone is not “smart” enough—but perhaps that will be the way I invest my tax season bonus this year.
Judy, this is an EXCELLENT post! Very comprehensive. I agree that it’s important for crafters to find a way to accept credit cards. I’m loyal to Square, but I know there are several good options.
Also, “Are you videoing?!” was hilarious. Hahaha.
Great, detailed tips! I have given up on craft fairs. In my local area, it seems people view them as a place to buy cheap things. Also, sewn and knitted gifts seem to go over better – people are a little scared off by art buying it seems 🙂
Wow, you’ve really covered everything! This is a great resource for new and veteran craft fair vendors alike.
A wonderful, comprehensive list!
I definitely need more on-hand inventory next year.
And you’re so right about table height and taking credit cards.
Still love this video 🙂
I “found” your new blog today on G+. I was sent an app to do a small show in March that I did last year. The cost was minimal and attractive; however, I discovered that most people wanted $5 items and I didn’t prepare for that. I made a few pairs of earrings and one of my regular clients showed up, thankfully, but I’m not going to do the show this year. I do better later in the year also.
Thanks for this post; it reaffirmed my decision not to do this show.
Where can i get the spinning racks.They look really nice.
Jennifer, visit www.achievedisplay.com, and enter “spinner rack” in the search bar. Hope this helps!