This has been an unusual month; I don’t often get sick, but caught some kind of virus that resulted in bronchitis, very little energy, and now laryngitis. Thankfully, I can still write even if I can’t speak well, so the result is this post after about four weeks of silence.
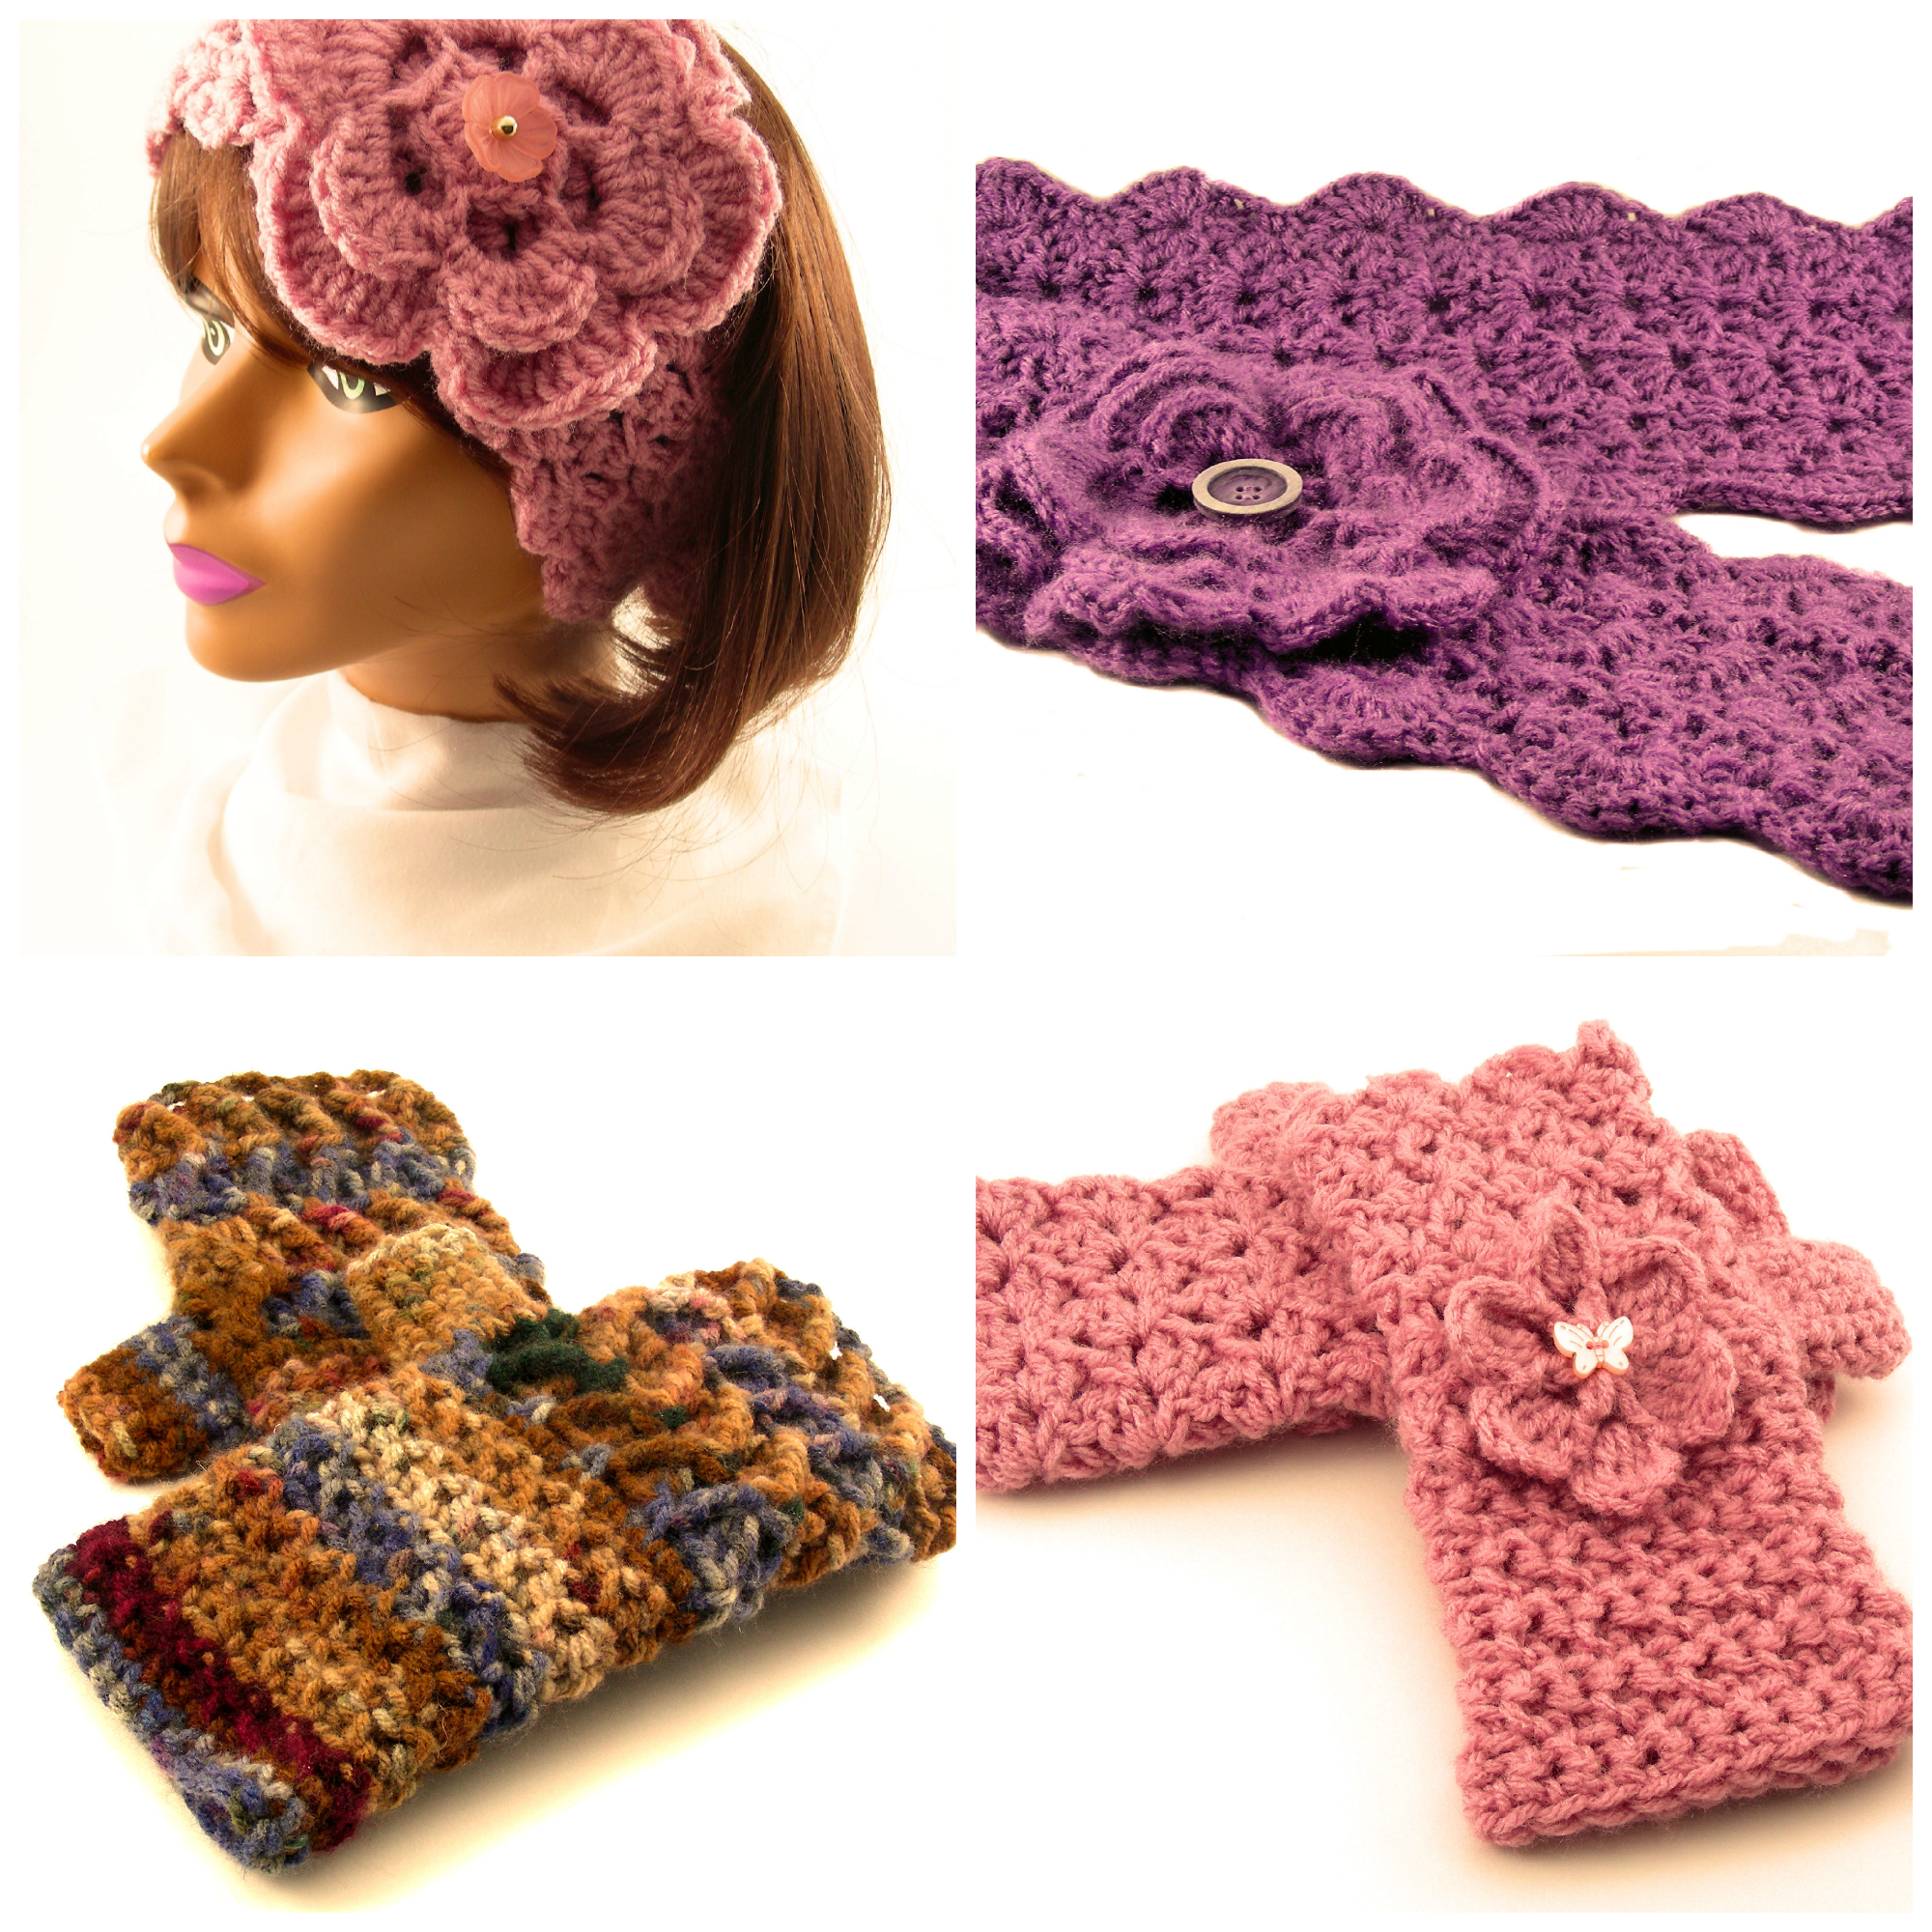
So, what have I been up to? This is the time of year when sales of crocheted scarflettes, fingerless mittens and headwarmers slow down. It’s no wonder, since spring is (hopefully!) just around the corner, and people don’t exactly want to wear cold weather apparel. It is also a great time to build up stock for much later in the year, and to take new photos of items already offered for sale. These are a few of the new items I added to JN Originals this month.
On the subject of photography, I complained recently to fellow Blogging Business Artisans friends that inconsistent lighting conditions have been making it difficult for me to get consistent photographic results. Rose of randomcreative suggested I try using a light box. She made her own using inexpensive materials, and has been very satisfied with the outcome for her jewelry designs. You may wish to visit her post in which she describes the tutorial and tips she used to make her own light box, which you can see here. The idea behind a light box is that you shine light onto your product through a layer of fabric or paper, creating soft, diffused lighting conditions because the light source is outside the box.
Although you can purchase a light box from a camera shop or an online venue, it is often expensive. A do-it-yourself version is usually inexpensive and easy to make; just visit YouTube, for example, and you’ll see lots of videos about how to make your own light box. I have seen light boxes constructed from a cardboard box with sides cut out, a clear plastic tub turned on its side, and box frames made from PVC pipe. I even saw a stand-up light frame made from PVC pipe that stood in front of a product sitting on the floor. After I watched several videos and visited several blogs, I decided that PVC pipe would work best for me because you can customize your light box to whatever size you need, and you can take it apart to put away when you’re finished with your photography.
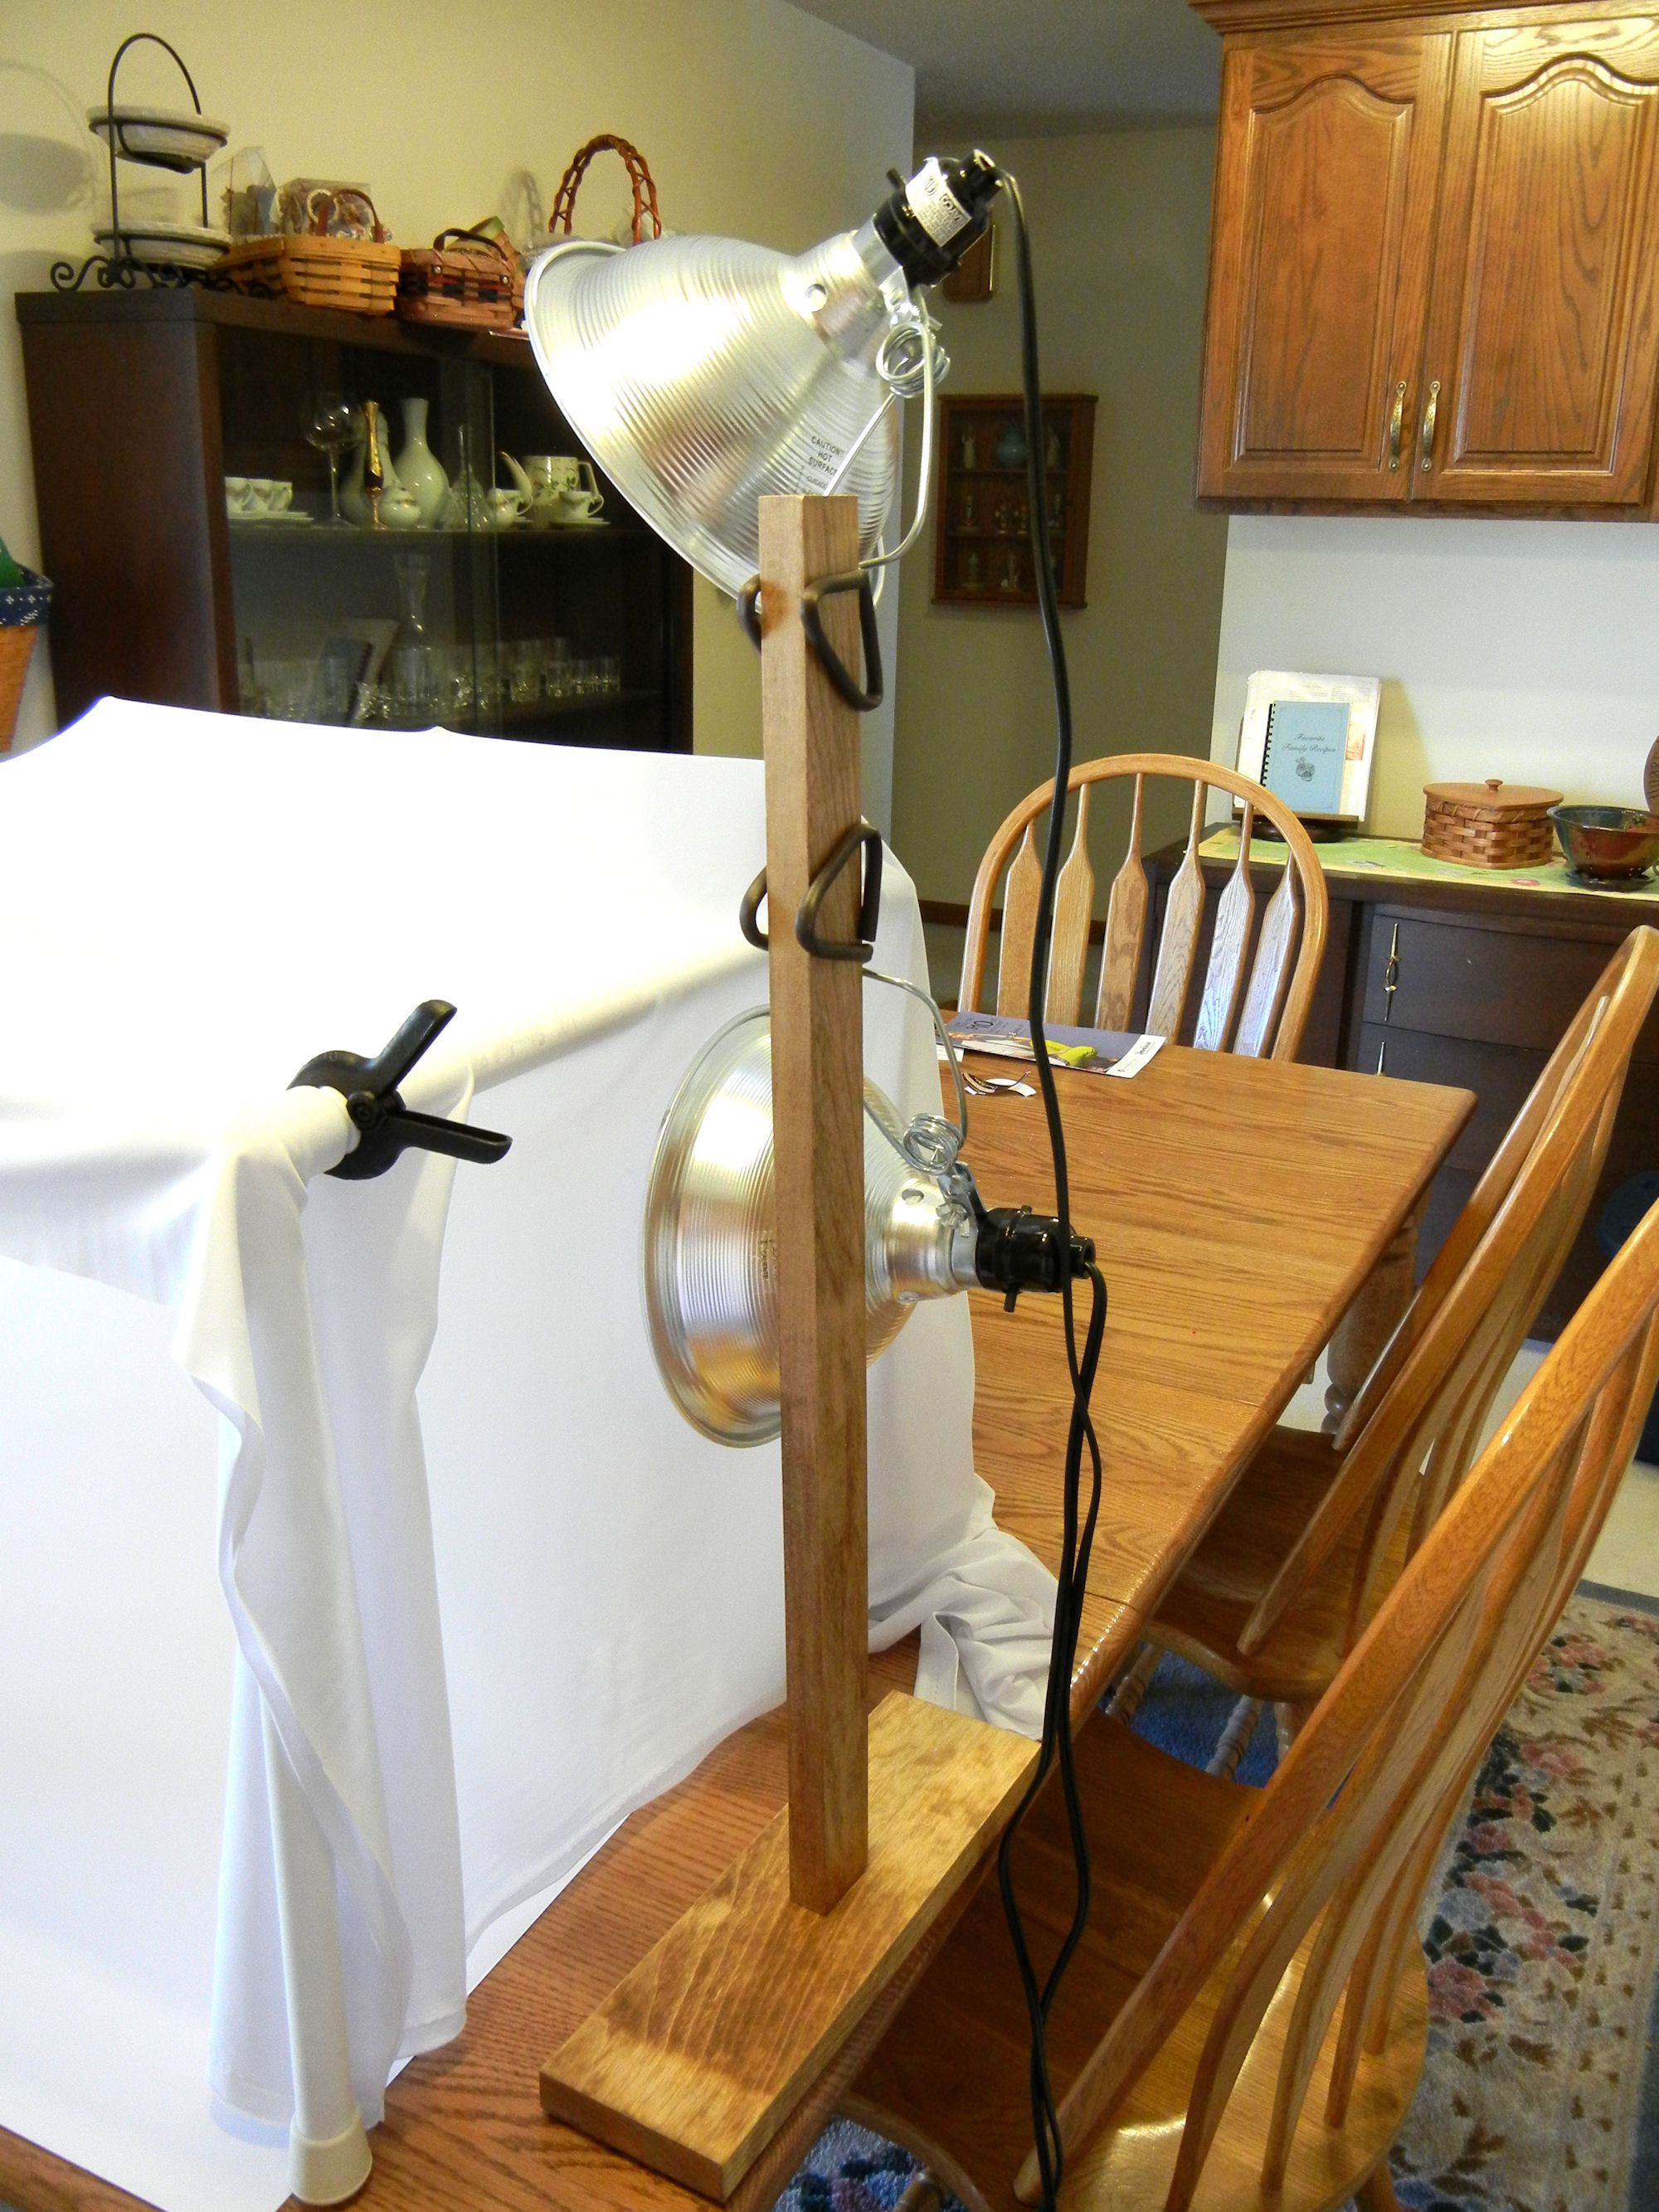
I enlisted my husband’s help to make a light box from PVC pipe that is tall enough to accommodate a manikin head. It’s nothing fancy, but it works.
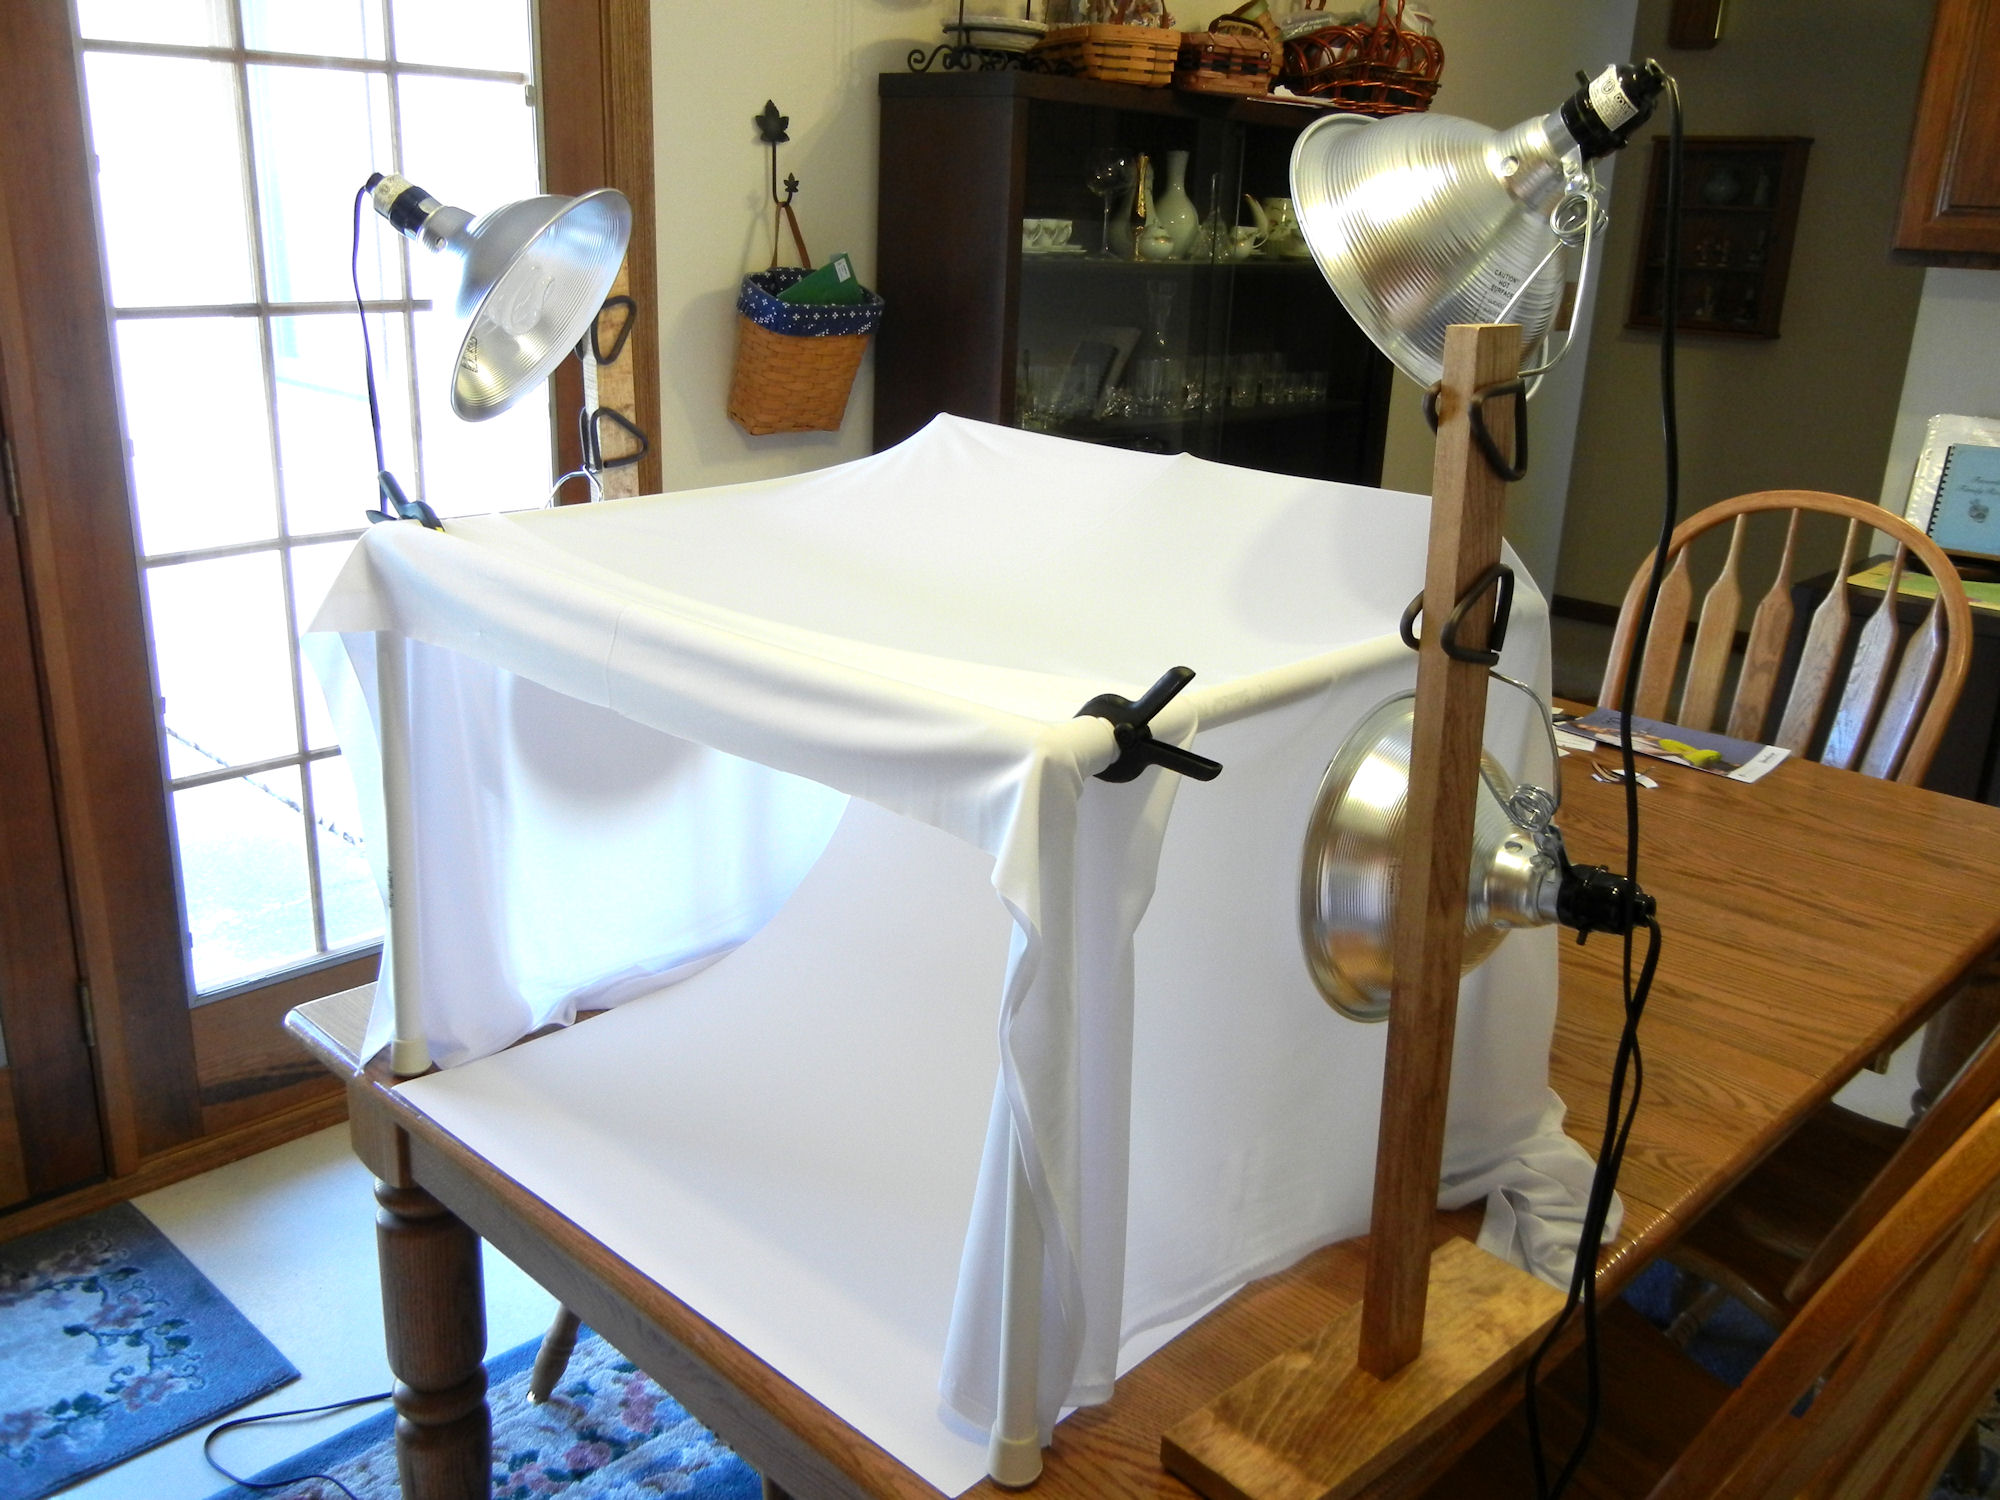
John cut PVC pipe in different lengths for me so that I can adjust the size of the box to fit multi-sized products. The pipes fit into 3-way elbow joints, and can be disassembled in a minute to put away, or reassembled just as quickly for a different size. He bought six half-inch-wide lengths of 5-foot long PVC pipe, and cut the pipes in lengths that measure 12 inches, 16 inches, 18 inches and 24 inches. He added 7/8 inch rubber feet to the legs so that they will not scratch my table. Costs were minimal:
- PVC pipe (5 feet long, 1/2 inch wide), $1.07 x 6 = $6.42
- PVC side outlet elbow (1/2 inch wide), $1.18 x 4 = $4.72
- Rubber leg tips (4 per pack, 7/8 inch wide) = $2.19
On the inside of the box, I clamped an oversized rectangle of Bristol board to the rear horizontal PVC pipe, forming a smooth, curved background for product photography. I simply glued together 2 sheets of 19 in. x 24 in. board you can find in the art section of any craft store. If you prefer to use fabric or felt instead, this also works well. My Bristol board sheets, which are 100-pound weight, cost me about three dollars altogether.

I draped white swim suit lining fabric over the frame, and anchored it in a couple of areas with plastic clamps you can find at any home improvement store. Technically, you can use muslin or just about any fabric through which light shines easily. Before I snap any photos, I turn on the clamp lights and set the white balance manually on my camera. Be aware that some lights take a little time to warm up fully and reach maximum brightness. You’ll notice that my lights point both to the sides and on top of the box frame. Some people use a light only on top, or two lights only on the sides. Honestly, you’ll have to experiment with the number and locations of your lights to see what works best for you. I can tell you that a bigger box will need more light, and also that the amount of light given off by your light bulbs will be factors. I used 23-watt daylight spiral CFL light bulbs. Most of the videos and blog posts I read suggest using daylight or OttLite bulbs. I spent $9 on the fabric, $34 on four clamp light fixtures, and $5.57 on light bulbs.

You’ll notice that my lights are clamped to upside down T-shaped stands that John made for me from maple craft wood. This is an optional item, since technically you can clamp lights onto anything that is the right height. That might be chair backs, the lip of a heavyweight vase, or even a vertical kitchen towel holder. In my case, however, I was looking for a fixture to which I could clamp my lights at variable heights, since I knew I was going to be using differently sized light boxes.
This entire week, I have been experimenting with my new light box. I have discovered that lighting is more consistent, but also that I can’t entirely get away from using a photo editing program such as Corel Paint Shop Pro or Adobe Photoshop Elements. Some product colors present more challenges, and so does learning the individual features of your camera. I find that using the macro and white balance settings of my camera are important, as well as using a tripod. And the camera flash remains off at all times! Previously, I placed white felt on a bed and used the diffused lighting from a bedroom window for my product photography. Lighting conditions varied throughout the day, and from day to day, creating consistency issues. With a light box, at least you can control the lighting, and that makes a big difference, I believe, in the outcome of your photos.
© 2013 Judy Nolan. All rights reserved.
Hey Judy, my husband made me the PVC box too! I only have two different sets of legs but need to get a third set made. I had some white nylon fabric I use but haven’t gotten the right kind of clamp lights next. Guess I’d better get going with them. I thank you for pictures of how you clamped your fabric and did the backdrop using Bristol paper.
when I made my lightbox, I wasn’t using diffused light with fabric. Opps, guess I forgot that step. I like the idea of the tubes, that can be broken down. My light box was just too big, and I eventually tore it up. I remember Rose talking about that white balance, but I don’t know where it is on my camera… Good write up! {:-D
Judy, it is STILL snowing over here (in fact right now while I’m writing this), so I guess the winter apparel season isn’t quite over yet 😉
Yes, knitted hats with long braids are very much the trend, so you’re right on top of that!
Your light box looks amazing! Very professional!
I find that the colour green is the most challenging to photograph. It either comes out with gray or yellow undertones. I use Corel to fix that problem.
Thank you, Judy! Great post! I love the idea of a PVC box that you can take down when not in use. I need to look into that —after tax season.
Great tutorial, Judy! I actually use a bookshelf! I moved the shelves around to create a large enough area, put in the poster board like yours, and use shop lamps with daylight bulbs like yours clamped to the top of the bookshelf. When needed, I put tissue over the shop lights to diffuse. I do need to play around with my camera’s white balance though! A little editing through Picasa works well for me, and when I need more white background, I have found FotoFuze to work well.
Your hubby was sweet to do all that work for you!!
This looks great! I love that you made it so it can be different sizes! Your photos are looking great too!
Looks great!
Judy, that’s great! Your light box looks so professional. I’m still using a white tablecloth and lights, but I think mine are getting better – getting a little more familiar with my camera.
Thanks for sharing – it looks great and your tutorial is awesome!
awesome!
I started with the PVC pipe/clamp light thing, which worked okay, but then I found a collapsible lightbox on eBay (made of a springy metal covered with white nylon). I also bought some cool white LED strips and made my own lights (by cutting the strips to fit foam-core sheets which are adhered to the inside of the box with Velcro®) and that works great… except the separate LEDs reflect on shiny metal parts if that’s what you’re photographing.
I agree, post-photography work with Photoshop or another editing program is essential. By the way, the lightbox comes with red, black and blue nylon backgrounds as well as the white to put behind your product. I got a large one for about $40 including shipping.
I like your setup from 2013 for lighting products. I am ready to make one like yours. Have you found any new bulbs you like? Have you begun to use LEDs? Do you use all three lengths which your husband first cut? I like your light stands. I’m thinking I need a simple but effective way to set-up and use different backgrounds. Please visit our shop at Peddlersroost on ETSY. Sorry I don’t know what an HTML tag is. I want be cordial.
Do you have to edit the photo to not show the joint between the white cards? Seems like it would often fall into the photo area. Did you glue or tape the sheets together? What specific material, and how’s it held up? I’d thought one might want to make a cube, tying legs together like the top. Is yours rigid enough without that bottom reinforcement?
Good observation! Sometimes I do have to edit the “join.” On the other hand, most of my photos benefit from some editing.