I have a number of cutting mats that I use for both paper crafting and sewing and didn’t think I needed another, but I was wrong. A few weeks ago I spotted a magnetic, self-healing cutting mat at my local scrapbooking shop, and got pretty excited about it. I didn’t absolutely need it, but I’m a Tool Girl, so I’m afraid it had my name on it and I took it home. My initial thought was that this generously sized 16-inch x 20-inch cutting mat that comes with a magnetic ruler and four magnetic posts would be great for paper crafting, but it’s perfect for sewing, too, with all of the built-in grid and bias lines. And if you’re cutting fabric with a rotary cutter, having a magnetic ruler and magnets to keep the fabric in place makes it really easy to do a clean cut. The mat is double-sided, which means that it has an extra-long life. The folks at We R Memory Keepers tell you that you can use the holes in the ruler for marking or as a stencil, and they point out that you can trace the scalloped edge of the cutting mat for scallop-edge projects.
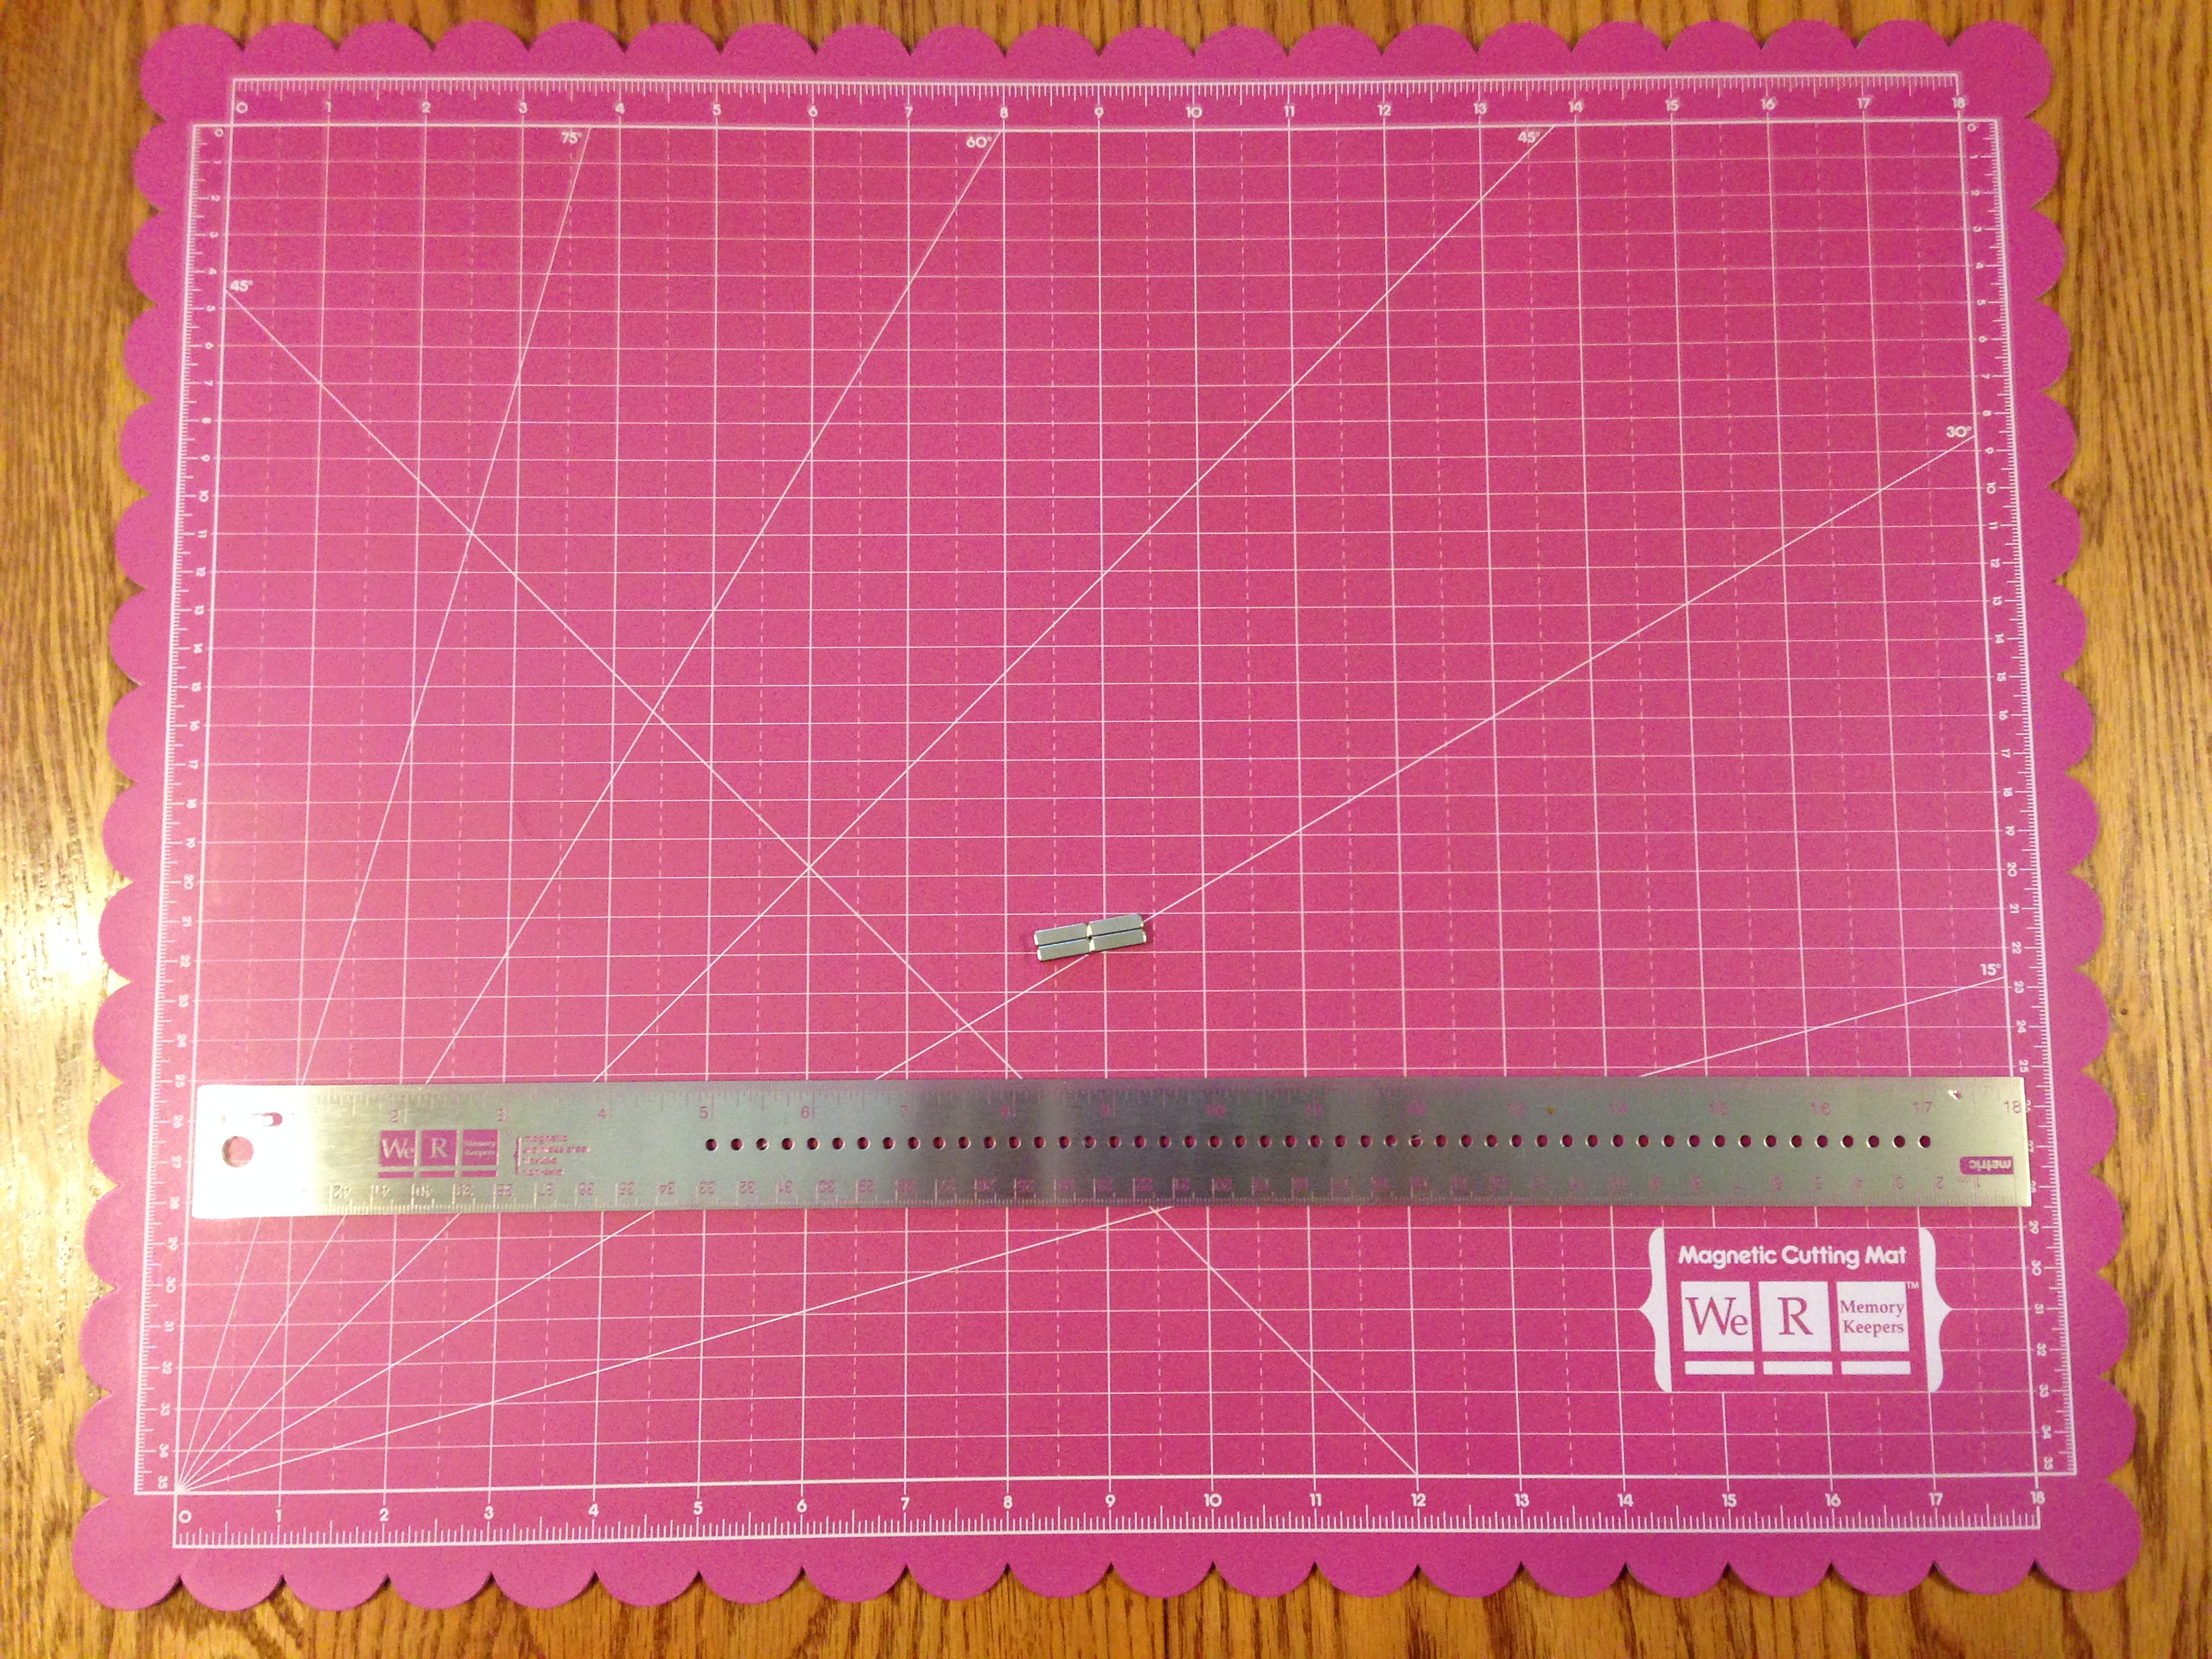
For my first project using the cutting mat, however, I intended to take advantage of the fact that the printed rulers on the edges of the mat allow you to measure in very small units. This is very handy when you’re lining up chipboard or book board pieces for a case bound book cover. If you look closely at the above image, you’ll notice that the two short sides are in centimeters, and the long ones are in inches, with lots of marks for smaller units. I thought the ruler would be handy, too, to mark the baseline of the chipboard pieces and keep them from shifting.
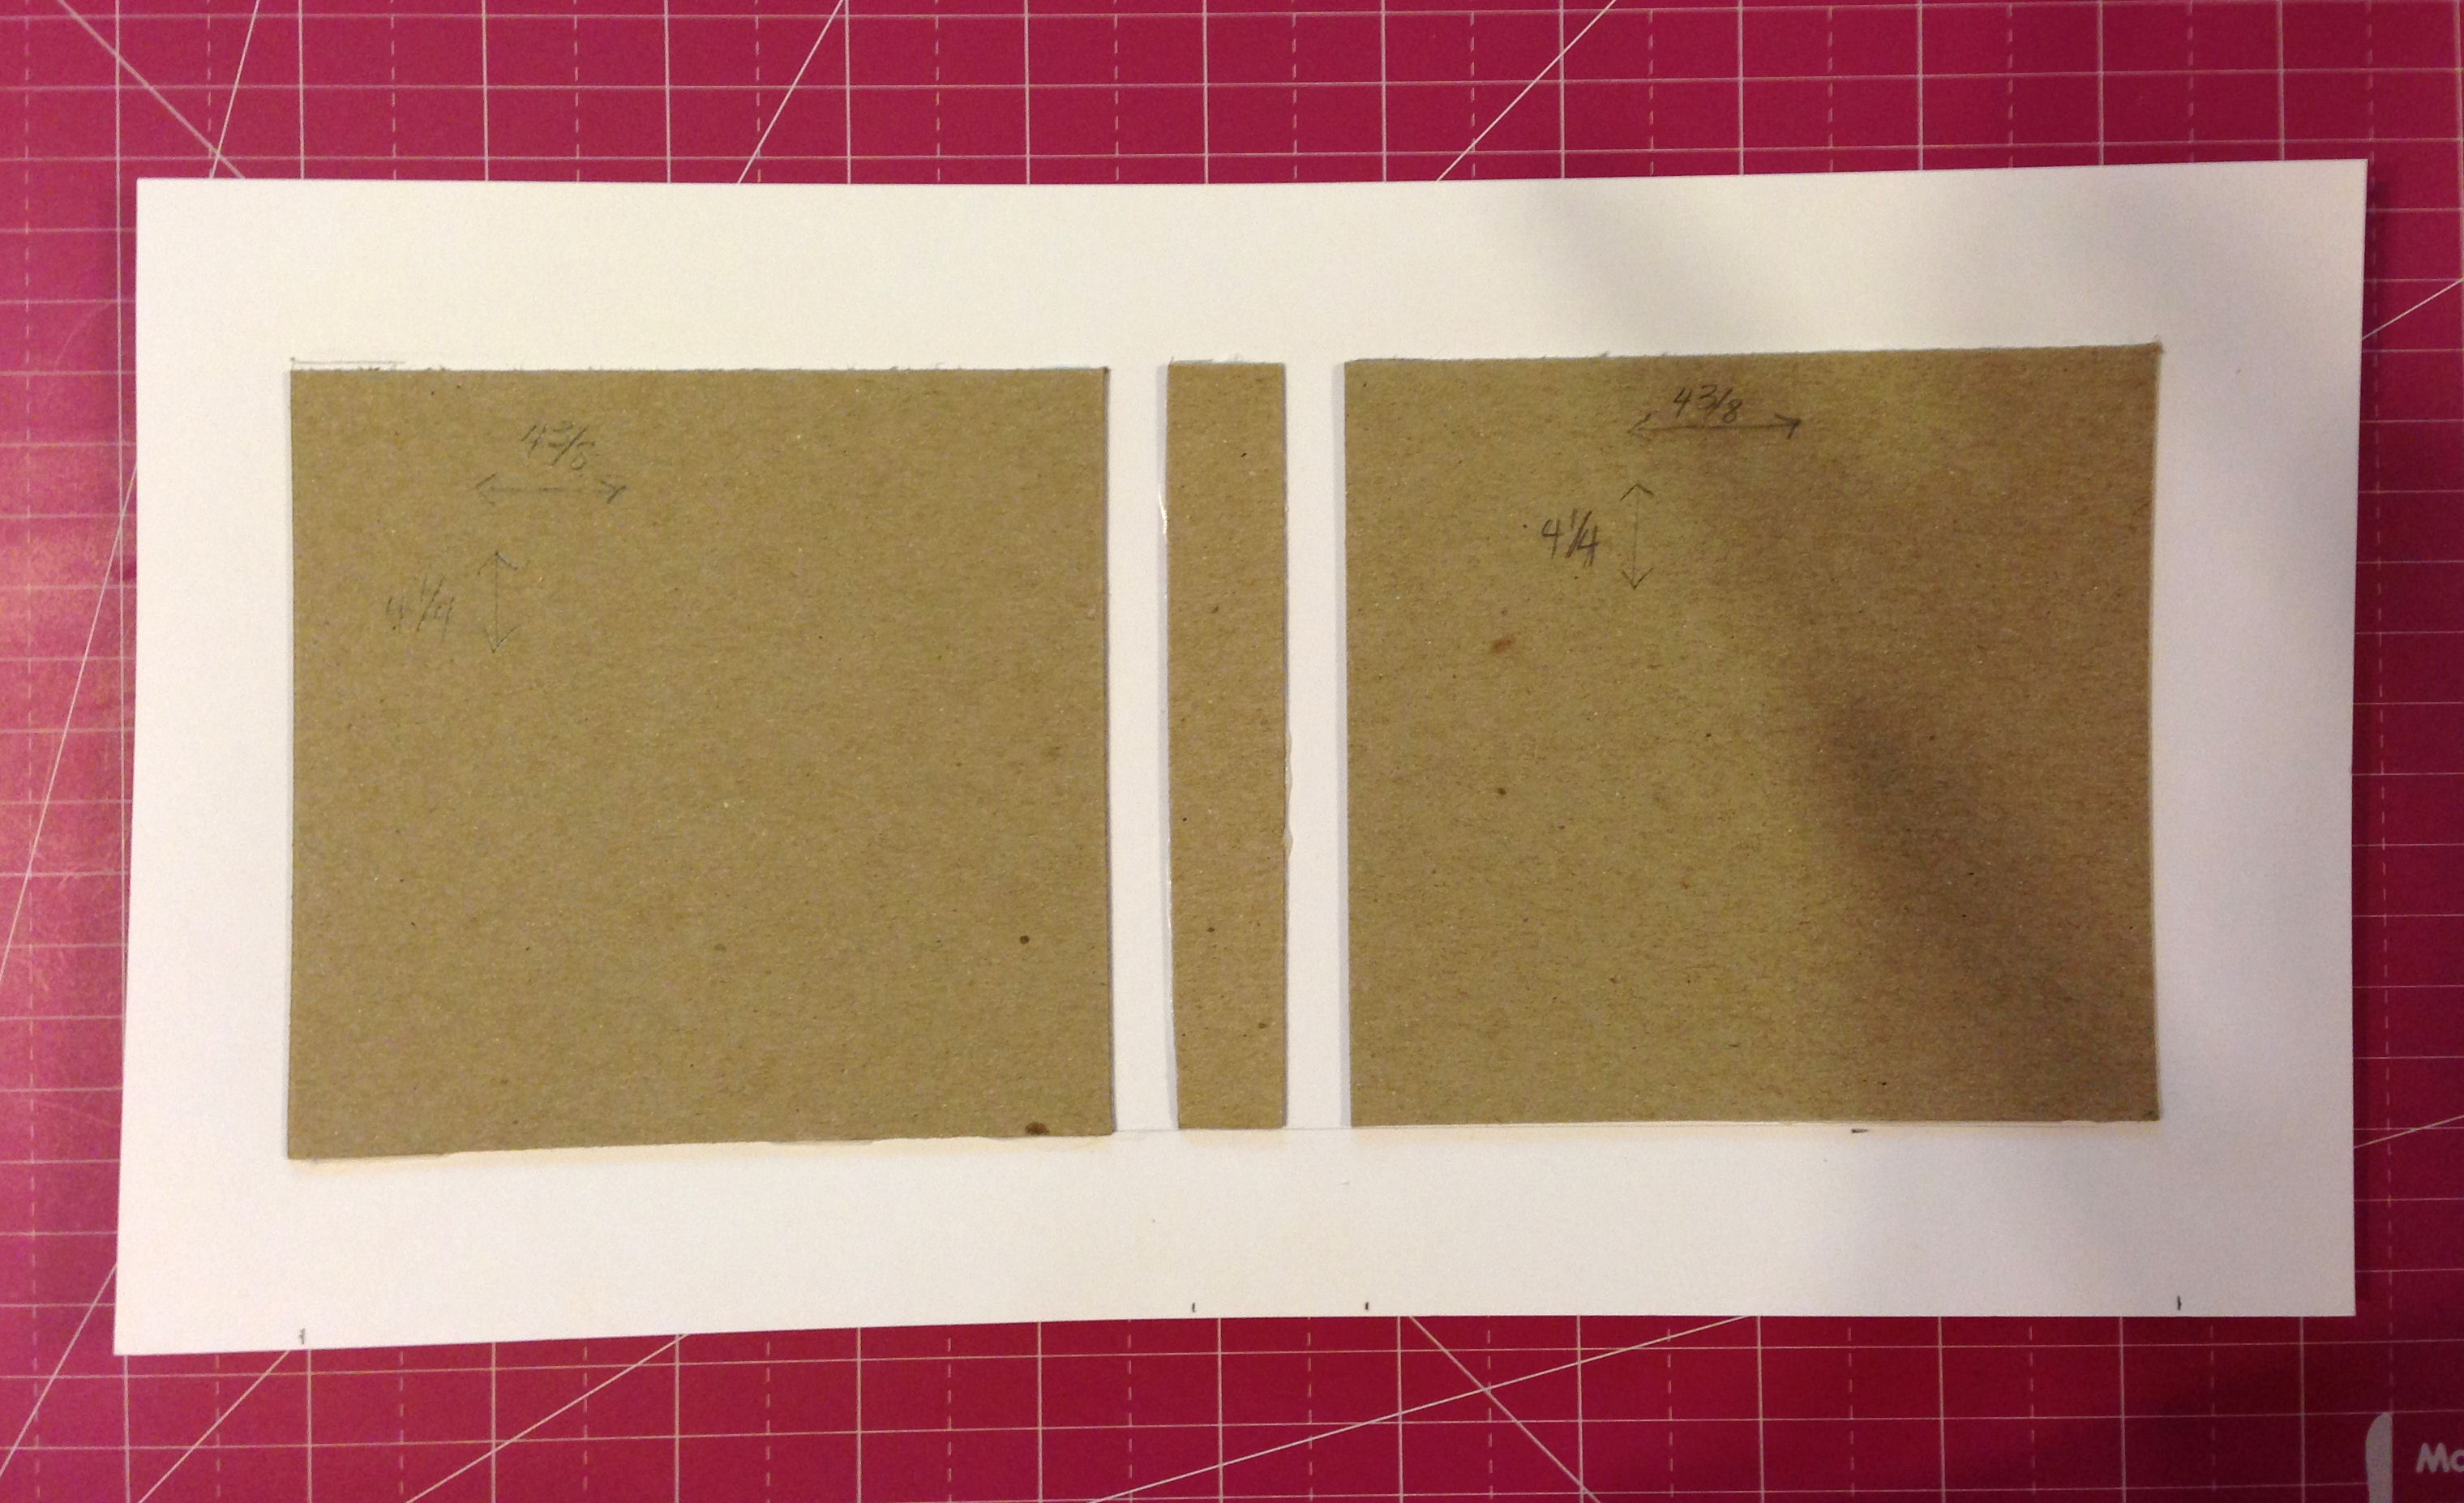
So, how do you start when you want to make a cover for your case bound book? You need to start with a text block, which I described in Creating a text block for a case bound book, because its measurements determine the measurements for the front cover, spine and back cover. There are a few simple formulas you can use, courtesy of Jennifer Bates of Sea Lemon, and here’s how they work:
- Cover width = text block width minus 1/4 inch plus 1/8 inch
- Cover height = text block height plus 1/4 inch
- Spine width = thickness of the text block (just stand the text block on its spine, trace it and measure)
- Spine height = same height as the cover
- Gap between the spine and the front cover (or back cover) = 1/4 inch plus the thickness of the board
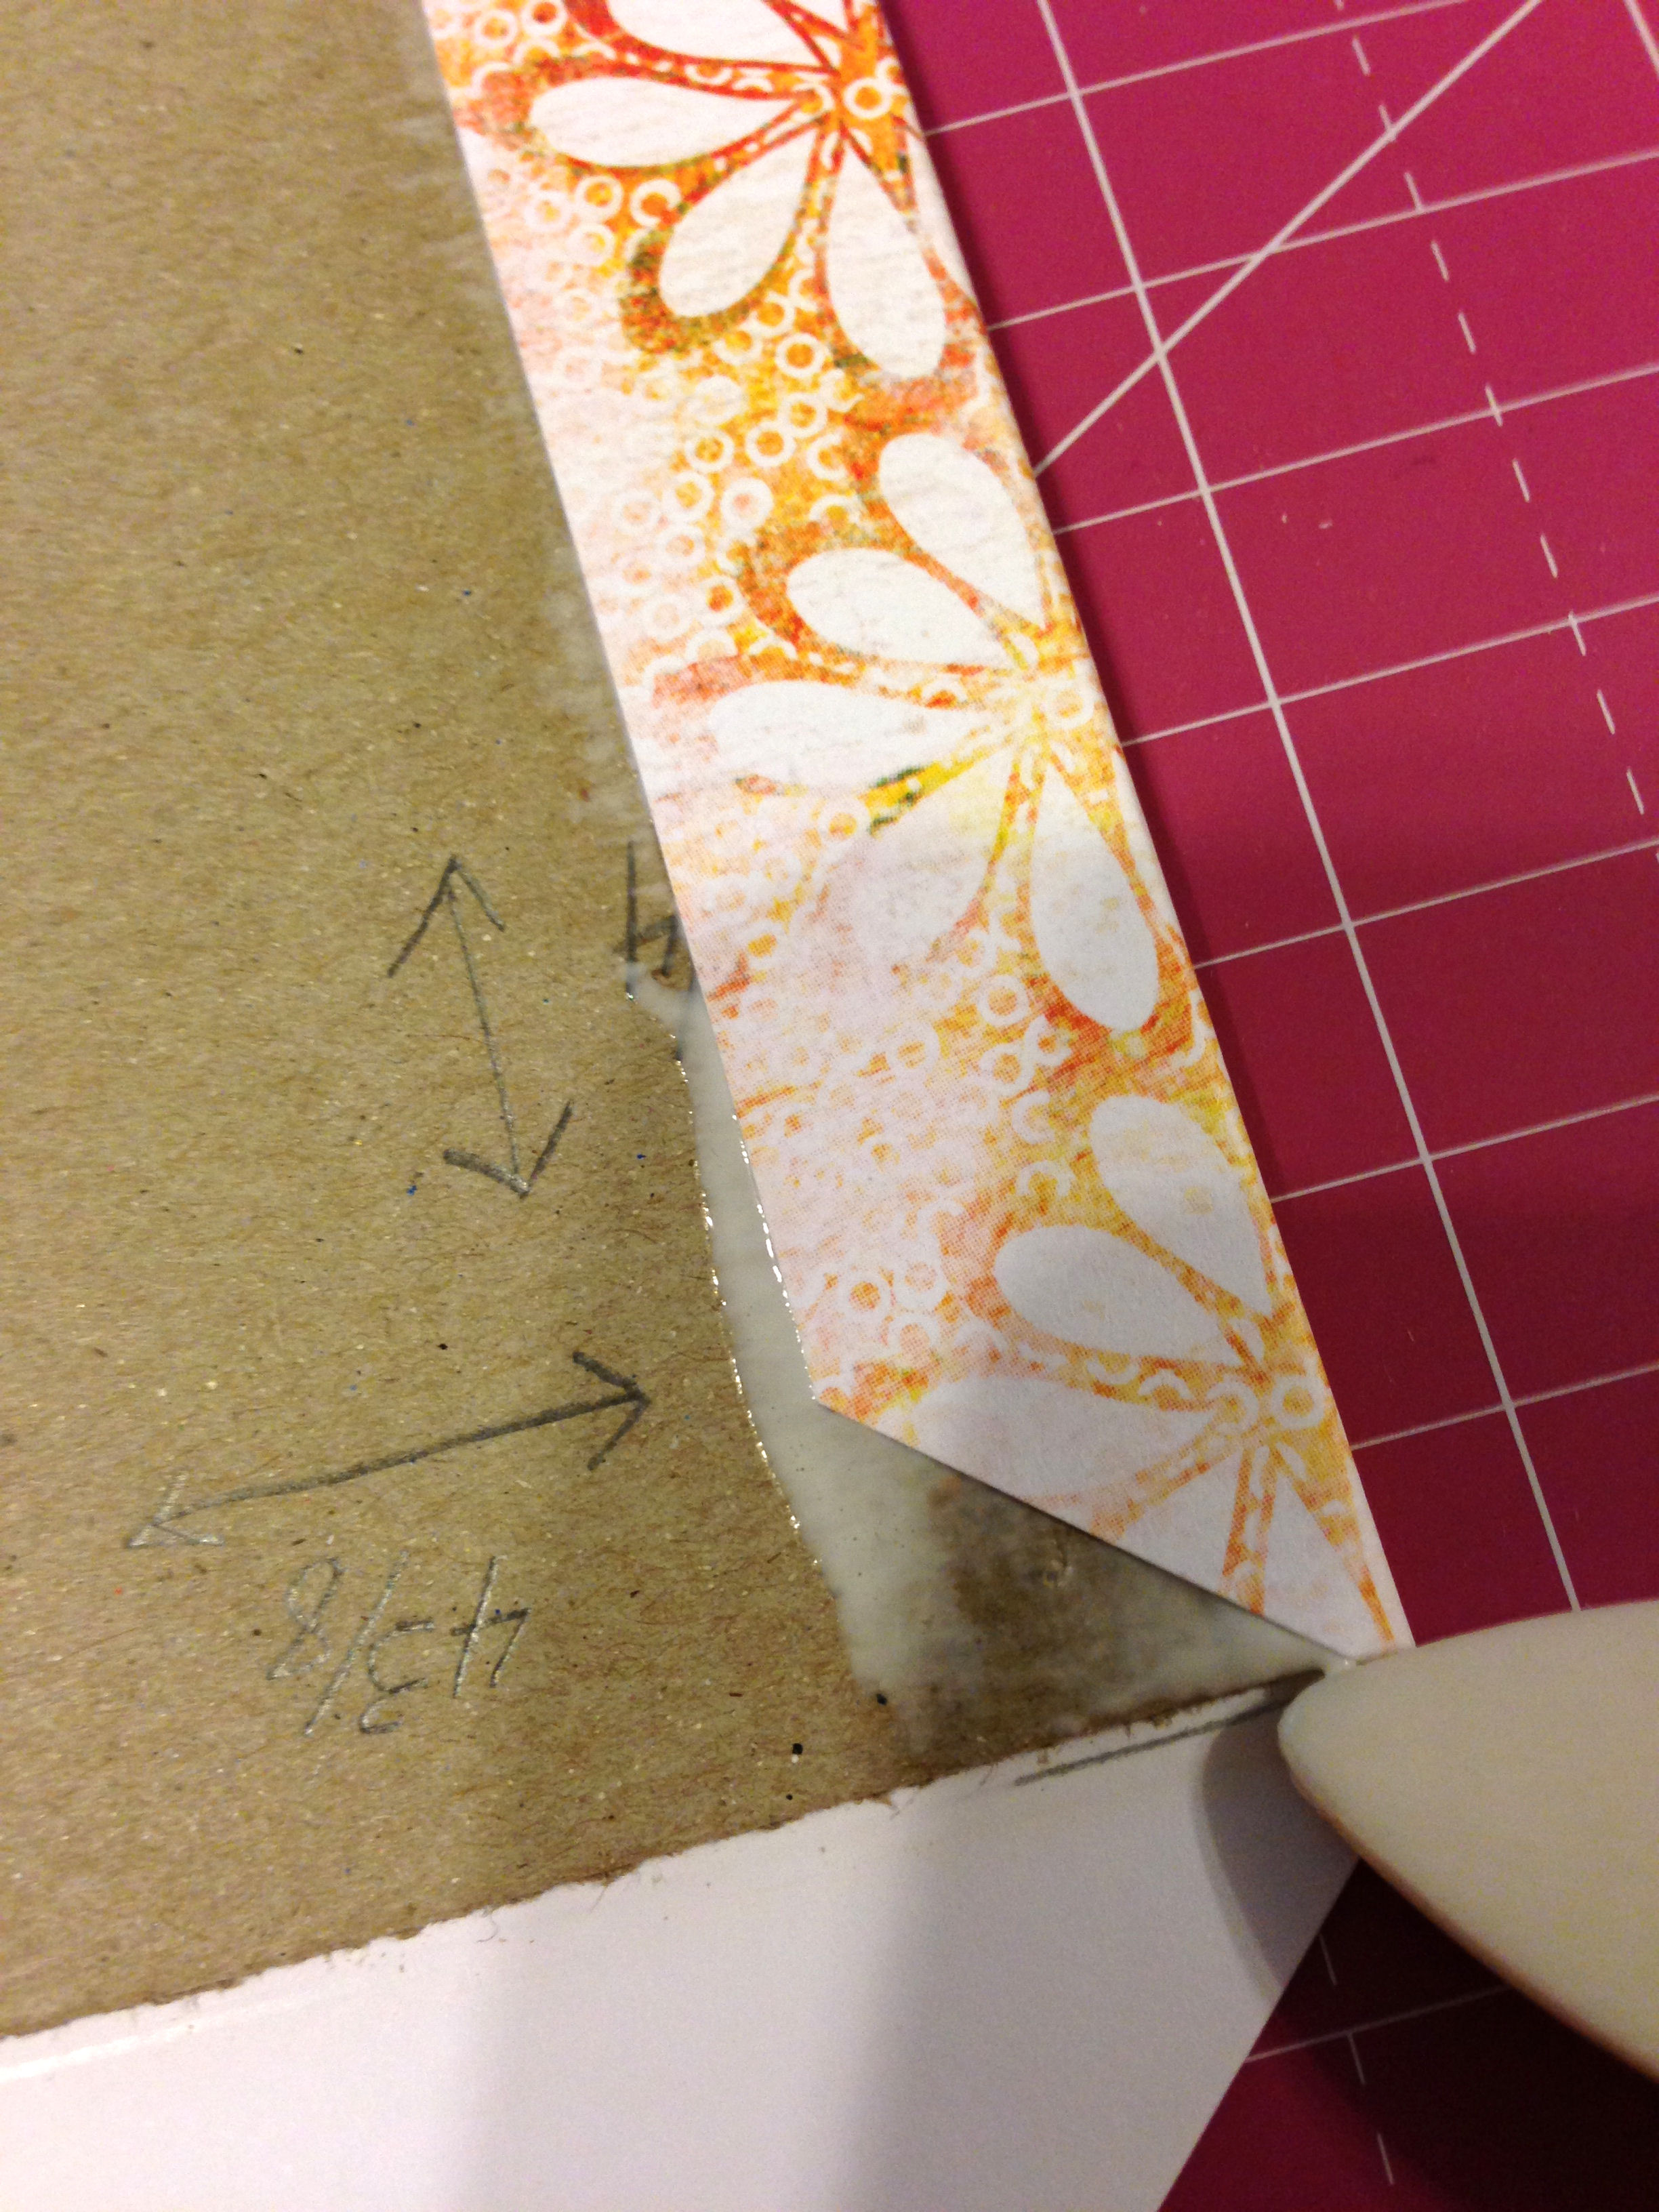
Once you have cut your boards to the appropriate dimensions, you’ll need to cut a piece of card stock or book cloth that leaves you with about an inch-wide border, all around. You can make your own book cloth if you like by adhering paper tissue to the back side of it with Heat N Bond® Ultra Hold, or you can simply iron on interfacing. Whether you use card stock or book cloth to cover your boards, you’ll be gluing the boards to the back side using PVA glue. I don’t mention it in my instructions, but I’m a fanatic about using my book press while glue is drying. I recommend you do the same (or use a heavy stack of books) because this will help prevent warping of both your cover boards and your pages. Use wax paper where necessary to prevent glue from seeping into areas it does not belong.
Your next step is to trim the corners of the book cover. Slice off diagonally the corners of the paper or book cloth, leaving a 1/8 inch margin where the two sides of each corner meet. This is important because it will prevent the boards from showing in the corner when you glue everything down. The image below doesn’t show it, but if you’re using paper, as I am, I recommend taking the tip of your bone folder, and scoring around the outer edges of the boards. This makes it easier to wrap paper around the boards.

Using a foam brush, apply PVA glue to one side of the paper or book cloth, beginning in the center and working out to the corners. Make sure you brush the edge of the board, too. Then, bend the cover toward the glued surface (not the other way around) because this will enable you to have a tighter, neater “wrap.” You can think of it as training the paper or book cloth to fold in the direction you desire. Go ahead at this point and do the opposite: fold the paper or book cloth toward the chipboard. Use a bone folder to smooth out bubbles. Remember that 1/8 inch margin of paper or book cloth that you are supposed to leave in each corner? Use the tip of your bone folder to press it down, snugged against the edge of the board. You’ll repeat this in each corner as you glue down each side of the cover. Apply extra glue if necessary.
Using the procedure described in the previous paragraph, work on the opposite side of the cover. Then work on the third and fourth sides. Remember to use your bone folder to flatten the extra paper or book cloth in the corners, flush against the board.
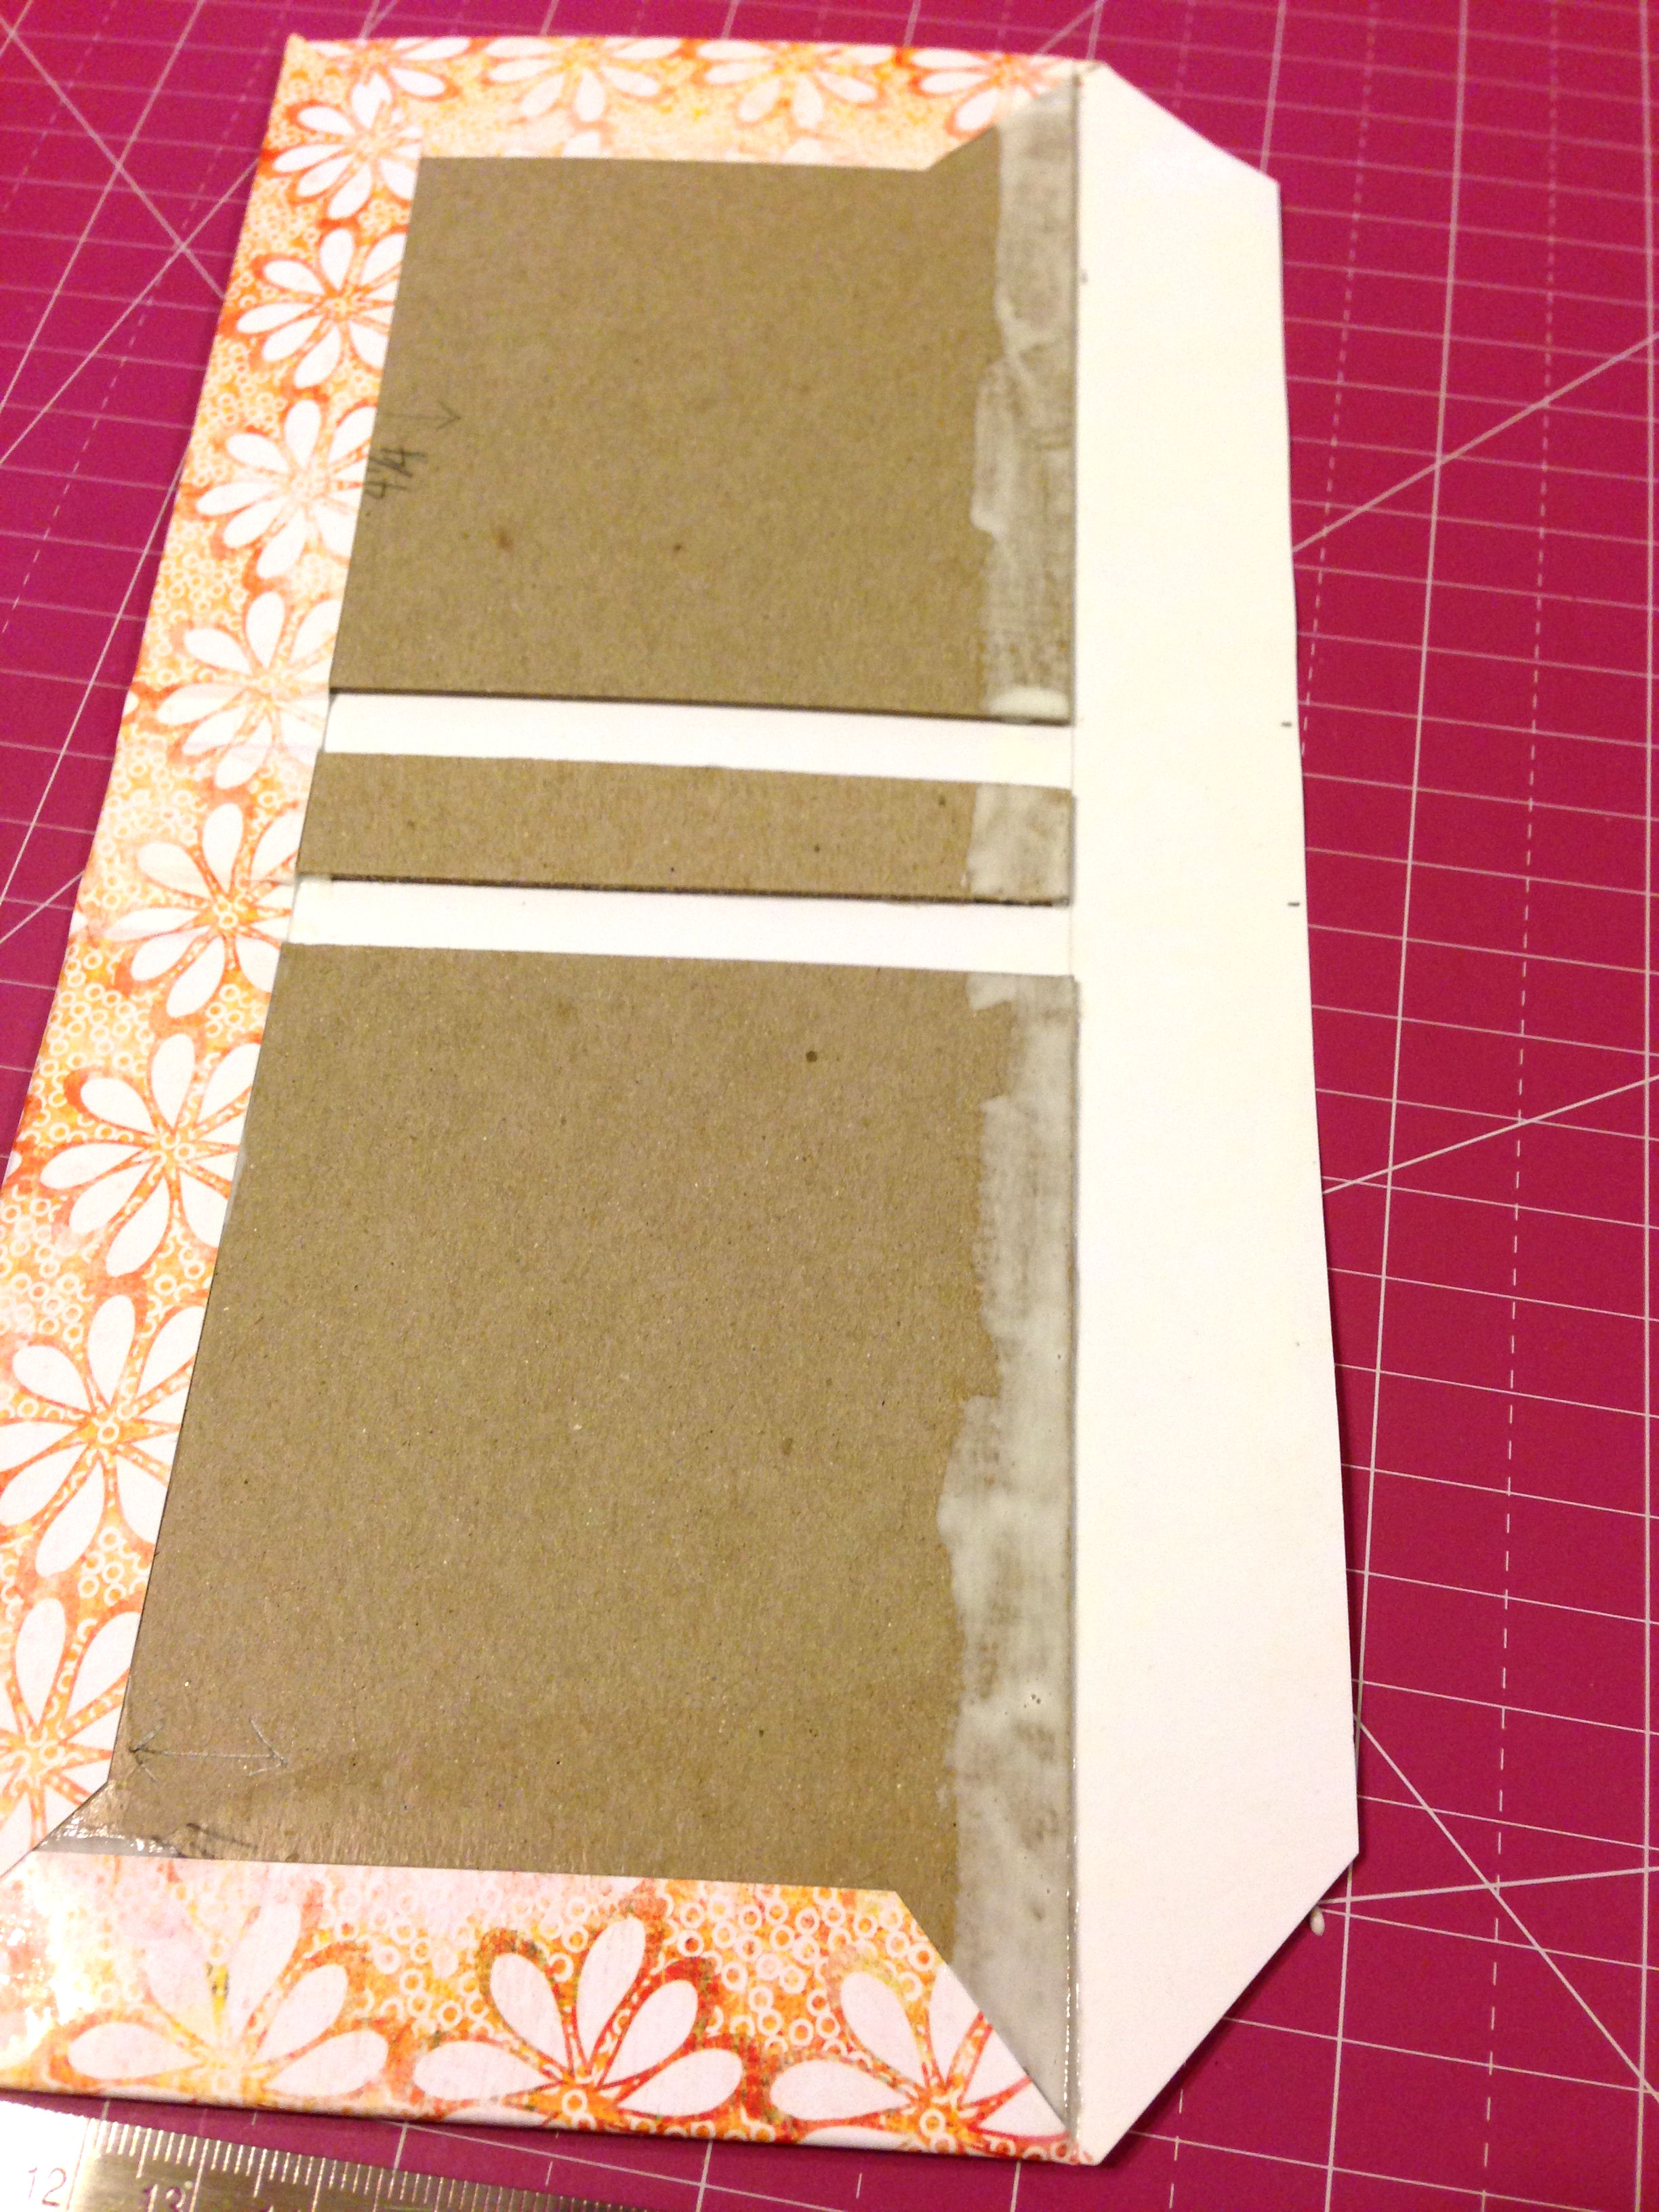
When you have wrapped the paper or book cloth around your boards, this is what it will look like from the inside and outside. I used my bone folder to gently smooth the paper into the gap on either side of the spine.
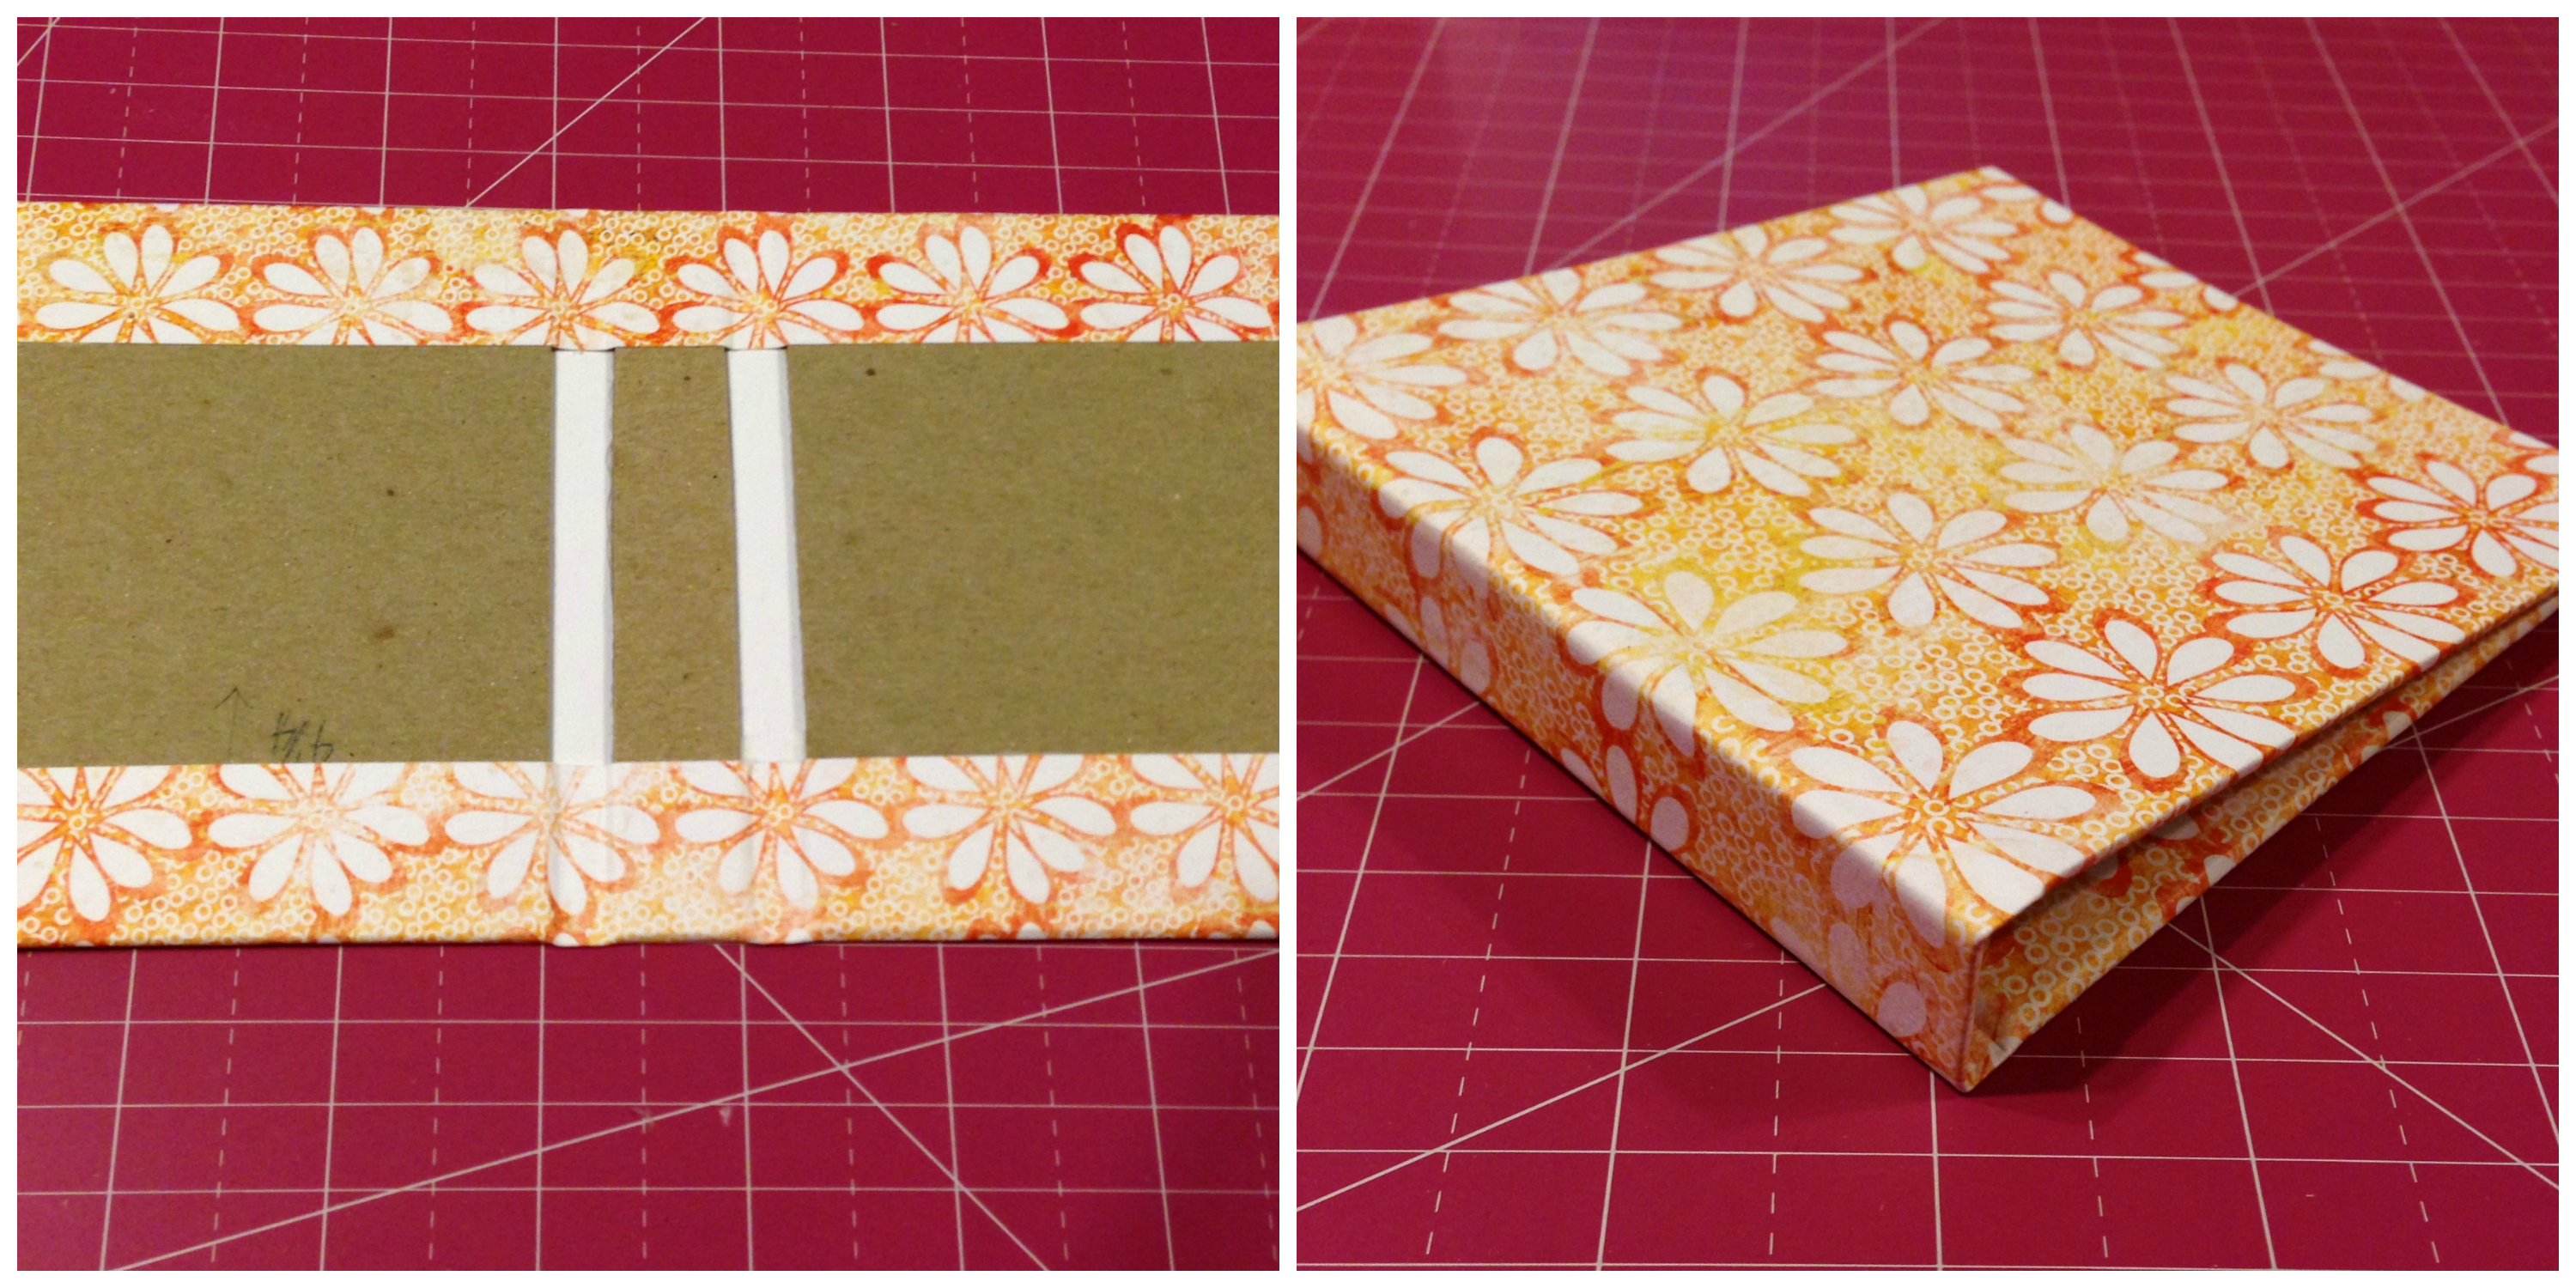
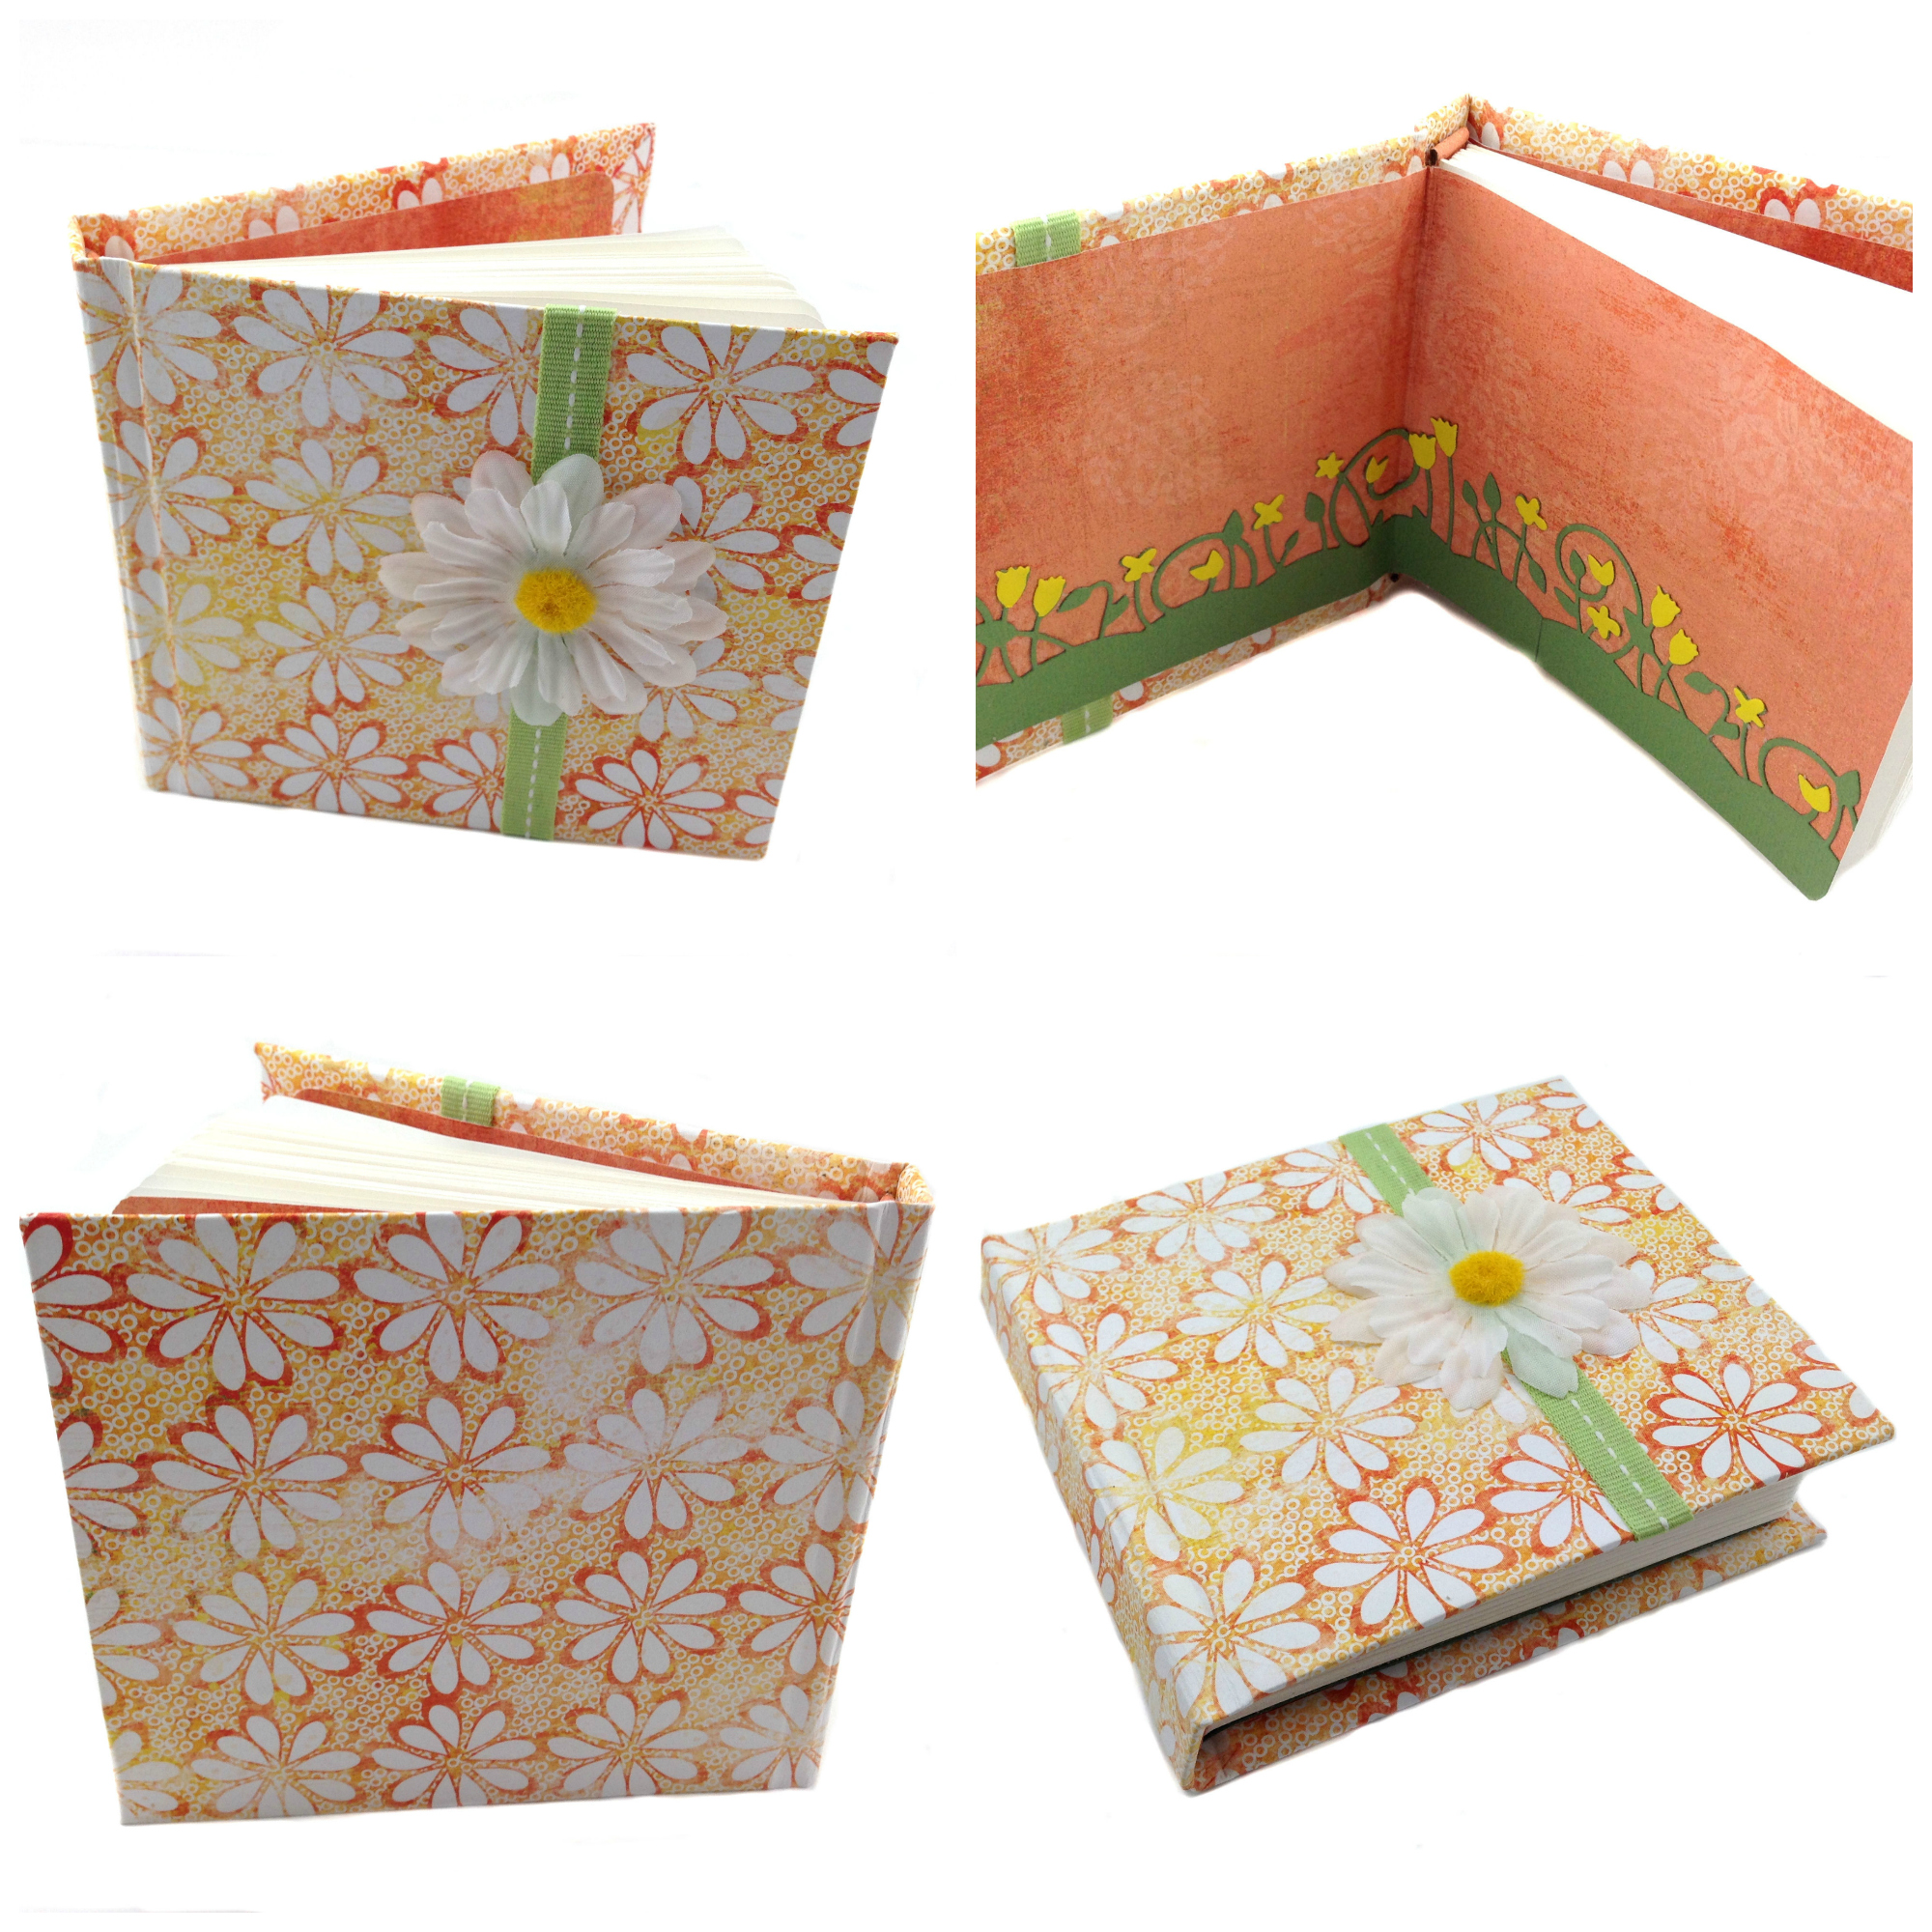
I decided to embellish my cover with a ribbon, wrapping the raw ends to the inside of the book and gluing them down.

When your cover is finished, you need to insert your text block. Brush PVA glue onto the back side of the end papers, and glue them down to the inside of the covers, leaving about a 1/8 inch border on each side. Do not glue down the spine or brush glue into the gap on either side of the spine; the end papers will anchor the text block quite nicely into place. I made a mistake and got glue into the gap. The result was that I stressed my end papers in this area, causing a small tear. My husband told me that he didn’t even notice it and that I shouldn’t worry, but all I could think about was the possibility that the small tear would become a bigger tear. I also noticed that the ribbon created a ridge in the end paper. I’m not sure how to solve that issue at this point, but in the future I may consider (a) using thinner ribbon, (b) scoring the board in such a way that the ribbon sinks into the “depression,” or (c) adding another layer to the end paper to hide the ridge. We’ll see!

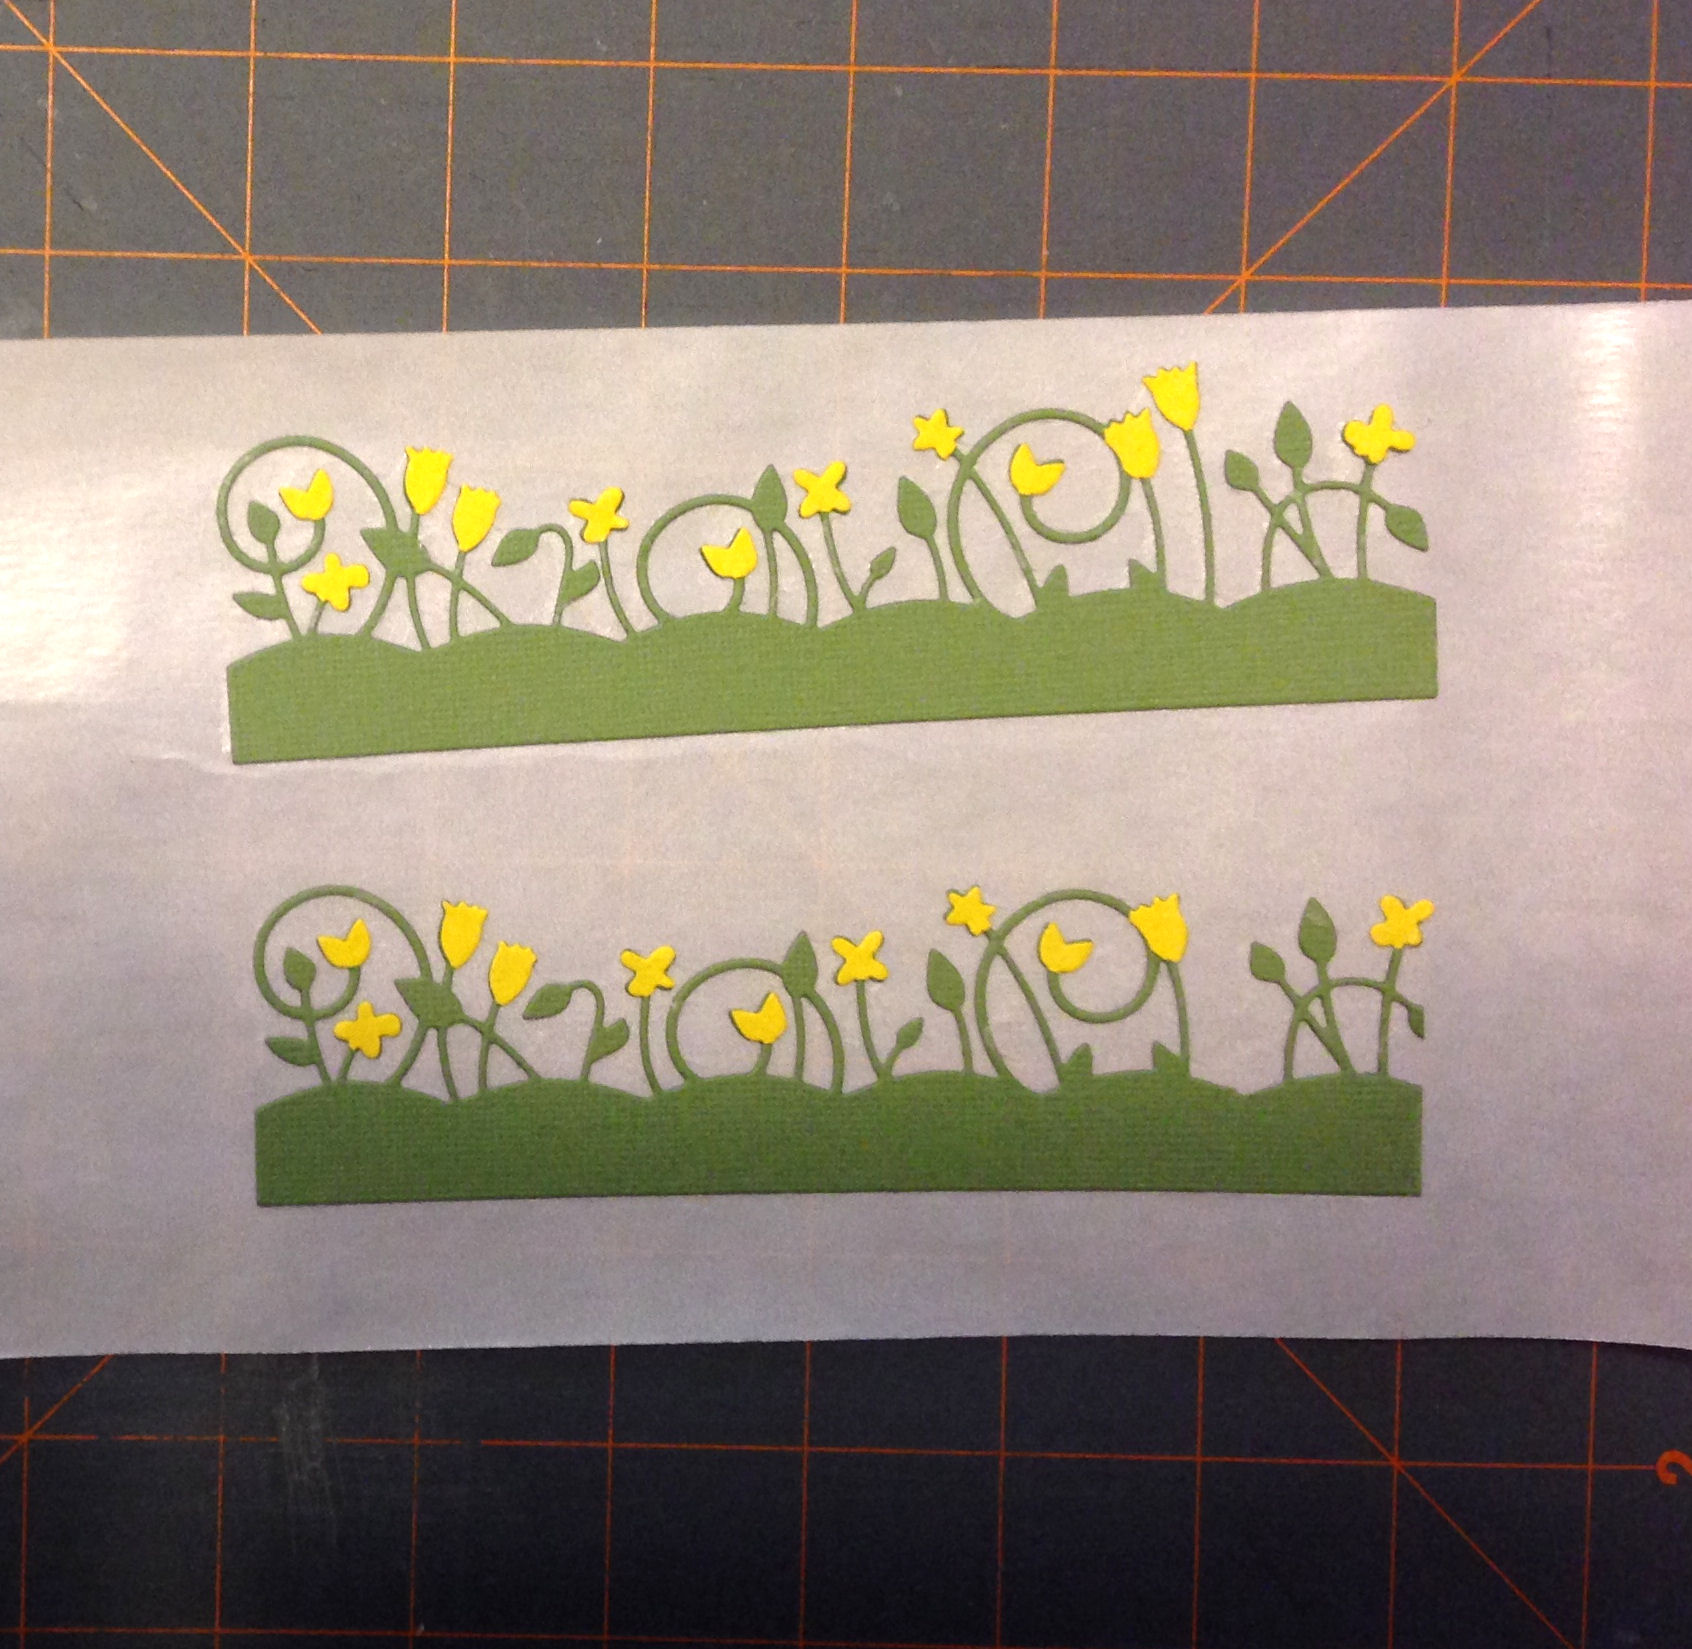
Meanwhile, that tiny tear continued to bother me. I decided that if I couldn’t fix it, I would reinforce the area. But I didn’t want it to look like a reinforcement! Instead, I used one of my steel craft dies to cut out a floral border in two colors, green and yellow. I cut and layered the pieces, and ran the border strips through my Xyron® Create-a-Sticker so that it would be easy to glue down the rather fragile border. If you have an adhesive eraser, this is also handy for removing the excess adhesive that inevitably gets stuck between all the small pieces.
Last step was adding a flower to the front cover of my book. If you’ve ever visited my Etsy shop, Mister PenQuin, you know that I usually add a floral embellishment to my books. This is my first case bound experiment with a sewn text block—definitely not perfect, but I learned a lot from this experiment.
© 2014 Judy Nolan. All rights reserved.
Judy, your book looks great! Case bound books have such a professional/finished look to them.
I love the added border to the inside too. That’s what I love about scrapbooking/paper crafts…you can always “fix” something with another layer 🙂
I think the new book looks great. Love the inside floral design.
LOVE IT. Is there anything you don’t now how to make? Haha.
There’s a perfect example of how a “mistake” can help create an even better product. The border looks great!
a successful experiment!
This is a wonderfully detailed and inspiring tutorial for anyone interested in bookbinding. I really appreciated how clearly you explained each step from measuring the text block to wrapping the boards and inserting the pages. The tips about using a cutting mat bone folder and book press are especially helpful for beginners trying to avoid common mistakes. I also liked how you honestly shared the small issues you faced and how you creatively fixed them with embellishments. It makes the process feel realistic and encouraging. A great guide that combines practical instruction with creativity thank you for sharing your experience!