In my previous post, I discussed making a zipper pouch for the plastic T-pins I use for seaming crochet projects, but as I considered all the small tools I use besides crochet hooks, I realized that I needed a compartmentalized organizer. I scoured the Web for patterns—and it’s amazing, really, what you can find that’s free—and discovered Marni Weaver’s Mini Jewelry Roll on the Pellon Projects site. Her mini jewelry roll is the perfect size, no bigger than an 8-1/2 by 11-inch sheet of paper when the roll is opened up. In my case, it’s ideal for my crochet tools: T-pins, stitch counters, stitch markers, seaming needles, and more.
In addition to providing her pattern on the Pellon Projects site, Marni has written a post on her own blog, Haberdashery Fun, that describes the step-by-step process of sewing the Mini Jewelry Roll. Go ahead and download the PDF pattern from Pellon Projects, if you wish, but then read her post, DIY .. Make a Mini Jewelry Roll, for more details and for tips about sewing with vinyl. The most important tips I can share, from personal experience, include:
- Use a Teflon presser foot, or coat the bottom of your presser foot with transparent tape, masking tape, painter’s tape, washi tape, or basically anything that will make the foot glide over the vinyl instead of stick to it.
- Lengthen your stitch length to at least 3.0.
- Use a wedge-tipped needle, such as a jeans/denim needle, size 100/16.
- Test your stitching on a scrap piece of vinyl, and adjust the upper tension on your machine as necessary, in small stages.
Because Marni’s pattern provides you with a list of materials, in addition to step-by-step instructions, I’m not going to repeat them with my post, but I will share my project photos with you and let you know where I encountered difficulties and how I overcame them. You begin by fusing Pellon® Fusible Thermolam® Plus TP971 to the back of your fabric with your iron on a wool/steam setting. You’ll love this batting, by the way, as it is quick and easy to apply, and adds body to your project while still being easy to stitch through.

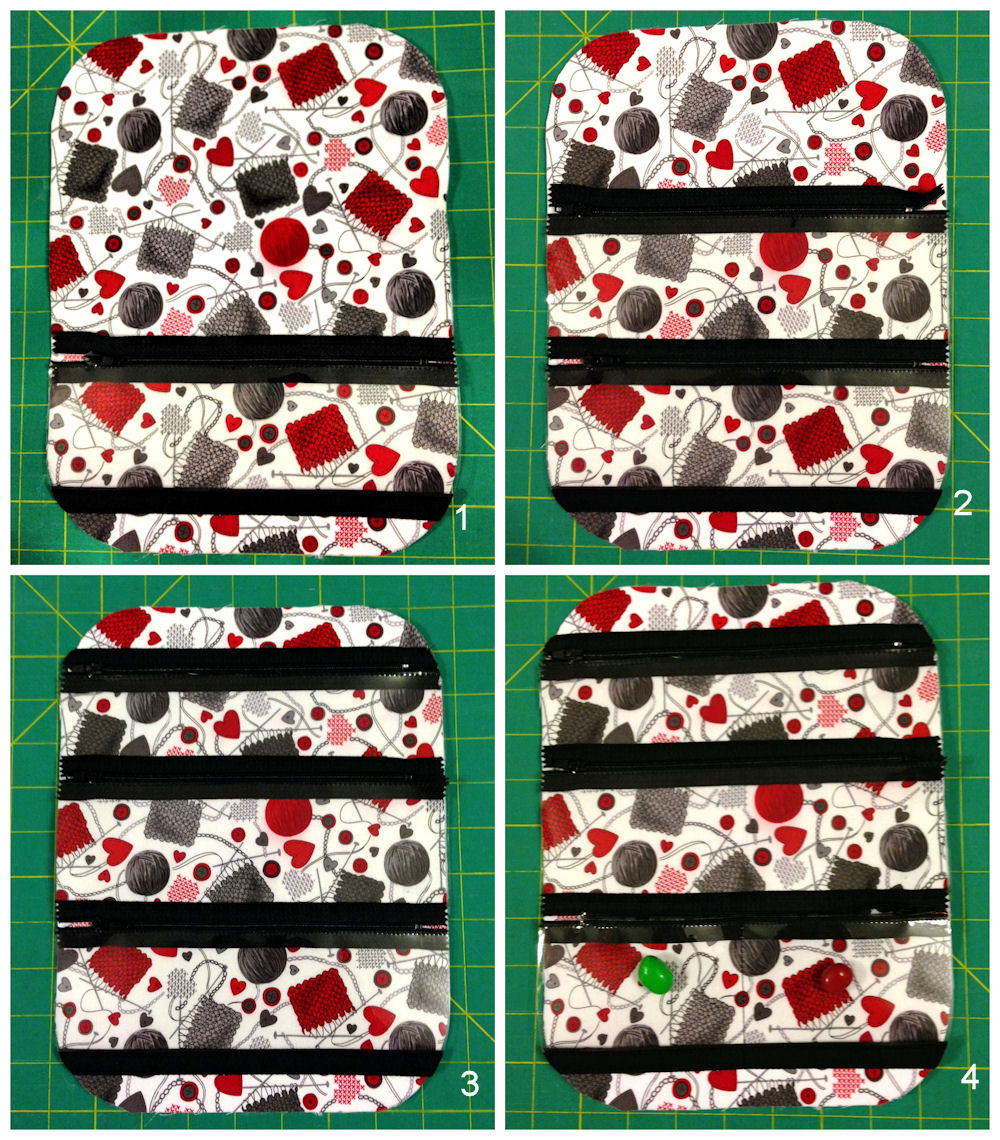
The next couple of photos show clear vinyl pocket sections with zippers sewn to the top of them, and double-fold bias tape sewn to the bottom of the lower pocket. Truthfully, the photos make the process look easy, but because I violated my own rule about working first with a scrap piece of vinyl, it was unnecessarily difficult. My problem? The pattern instructions called for double-fold tape measuring a quarter-inch when folded, but no matter what stitch length, needle type or tension setting I used, the lower thread was unstable. I could pull it out in about two seconds, with ease, in other words. The only solution that worked was switching to a wider double-fold tape that measured a half inch when folded. I’m guessing there was simply not enough fabric there for my needle/feed dogs to bite into. In any event, the wider tape worked, along with a stitch length of 3.0 and a tension setting of 7.5. I also made sure that the upper thread and lower thread matched by re-winding a bobbin with fresh thread. The zippers were a cakewalk to install; I just used my zipper foot—and it wasn’t necessary to coat the bottom of it with anything to make it glide over the vinyl. A note about the vinyl: the pattern instructions don’t specify what weight you should use. I would guess that either a lightweight (tablecloth) or heavyweight vinyl will work, but I chose a heavyweight vinyl because it tends not to wrinkle.

The pocket sections are top-stitched to the inside fabric from the bottom up. The instructions tell you to pin the pockets in place, but you really can’t use pins without leaving permanent holes in the vinyl. I used Clover Wonder Clips every step of the way, but you can use binder clips or even bobby pins or vinyl-coated large paper clips in the same way. This was the easiest part of the project, since it is basically straight stitching. You’ll notice, in the last photo, that I split the bottom into 2 sections by stitching down the middle. I inserted a Peanut M&M® candy in each section so you can see it better.
The last few steps for assembling the organizer include “pinning” the two halves (inside and outside fabric) of the organizer together with Clover Wonder Clips, sewing straps made of double-fold tape to the top of the outside fabric, and stitching double-fold tape all the way around the edge of the fabric. The instructions tell you to use a quarter-inch seam to attach one side of your double-fold tape to the inside of the organizer, then wrap the tape to the back side, then flip the fabric over again and stitch in the ditch so that you catch the back side of the tape and fasten it in place, but I tend to do the last step by hand, since I think it looks neater. I sat in front of the TV last night and watched Olympics coverage while stitching away, and the job got done in very little perceived time.

The finished project is as functional as I hoped, both inside and outside. I now have one fabric case for my crochet hooks (see Measure twice and cut once), and one fabric organizer for most of the remaining crochet tools.

This is a project that I started and finished during the better part of one day. As I mentioned previously, it is really important to test your stitching on a scrap of vinyl before you work on your project. Make a note of your machine settings in a sewing notebook. I use a stitch diary like the ones I offer in my shop to keep track of such notes, since I tend to misplace sticky notes.
If you are interested in Marni Weaver’s Mini Jewelry Roll or her other patterns, be sure to visit the DIY Projects section on her Web site.
© 2014 Judy Nolan. All rights reserved.
Wow! Love this.Looks great. It’s amazing all the uses for the roll. Thanks for sharing and giving links to my blog 🙂
I’ve never sewn with vinyl. What a cool tip about covering the foot with tape to keep it from sticking! I never would have thought of that but will keep it in mind in case I sew vinyl in the future.
What a great way to keep things handy and under control!
What a perfect piece for all your crocheting tools. And what a great tutorial too.
What a great project!! And good tips on sewing on vinyl. It can be a little tricky. This would be a wonderful Mother’s Day gift for someone hooked on crochet.